Every kitchen or bathroom renovation reveals new surprises. One of the most common issues homeowners face is the gap between cabinets and wall. These spaces can make your finished room look incomplete, collect dust, or even hide pests. Many people overlook these gaps, but fixing them is essential for both looks and function. If you’re struggling to cover cabinet gaps, you’re not alone. This guide will help you understand why these gaps happen, how to fix them, and which solutions work best in different situations.
Why Do Gaps Appear Between Cabinets And Wall?
Cabinet gaps can seem mysterious, but they’re actually quite common. The main causes include:
- Uneven walls: Most homes have walls that aren’t perfectly straight, especially in older buildings.
- Cabinet installation issues: Sometimes cabinets are not installed flush, leaving small spaces.
- Expansion and contraction: Wood and materials expand and contract with temperature and humidity changes.
- Design choices: Some cabinets are designed with intentional gaps for flexibility or movement.
Most gaps are less than an inch wide, but some can be larger. Even a small gap can affect the room’s appearance and cause practical problems.
Preparing To Fix Cabinet Gaps
Before you start covering any gaps, you need to measure and inspect. This step is often missed by beginners, but it’s crucial. Here’s what to do:
- Use a tape measure to check the width and depth of the gap at several points.
- Look for signs of moisture, mold, or pest activity.
- Decide if the gap is consistent or varies along the cabinet.
- Check the material of both cabinet and wall (drywall, tile, plaster, etc. ).
Being careful at this stage will help you choose the best solution later.
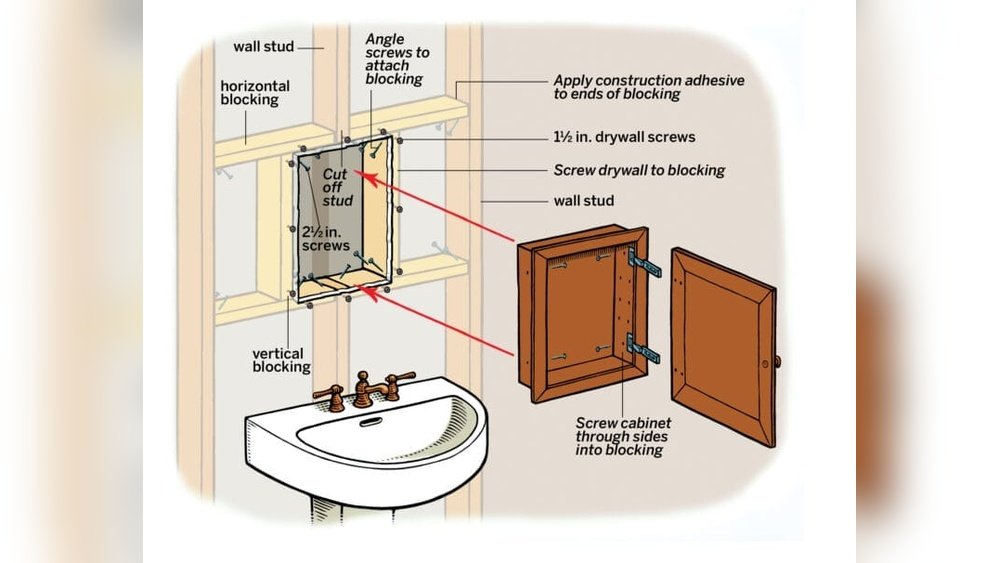
Credit: ncwoodworker.net
Top Methods To Cover Cabinet Gaps
There are several ways to cover gaps. Each method suits different sizes and types of gaps. Here are the most effective options:
1. Caulk
Caulk is a flexible filler used for small gaps (usually less than 1/4 inch). It’s easy to use and blends well.
- Best for: Gaps under 1/4 inch, painted walls, modern kitchens.
- Materials needed: Painter’s caulk, caulk gun, masking tape, damp cloth.
- Steps:
- Clean the gap area.
- Apply masking tape on both sides for clean lines.
- Load caulk into the gun and run a bead along the gap.
- Smooth with a damp finger or tool.
- Remove tape and wipe excess.
Tip: Use paintable caulk for colored walls. If the gap is near a heat source, use heat-resistant caulk.
2. Cabinet Filler Strips
Filler strips are thin pieces of wood or laminate that match the cabinet finish.
- Best for: Larger gaps (1/4 inch to 1 inch), uneven gaps, visible sides.
- Materials needed: Filler strip, saw, screws, drill, wood glue, touch-up paint or stain.
- Steps:
- Measure the gap’s height and width.
- Cut the strip to size.
- Attach with screws or glue.
- Touch up for a seamless look.
Filler strips are used by professional installers for a custom finish. Some cabinets come with filler strips, but you may need to buy them separately.
3. Trim Or Molding
Trim adds a decorative touch and covers gaps up to 1 inch. There are many styles—quarter round, shoe molding, or custom trim.
- Best for: Gaps between cabinet and wall or floor, traditional kitchens.
- Materials needed: Trim piece, saw, nails, hammer, paint or stain.
- Steps:
- Cut trim to fit the gap.
- Nail or glue in place.
- Paint or stain to match.
Tip: Use flexible trim for curved or uneven surfaces.
4. Backer Rod And Caulk
For extra-wide gaps (over 1/2 inch), using a backer rod (foam cylinder) before caulk creates a solid base.
- Best for: Gaps over 1/2 inch, deep spaces.
- Materials needed: Backer rod, caulk, caulk gun.
- Steps:
- Push backer rod into the gap.
- Apply caulk over the rod.
- Smooth and finish.
This method is often used in commercial installs. The backer rod saves caulk and prevents cracks.
5. Scribe Molding
Scribe molding is a thin, flexible strip that’s shaped to match uneven walls.
- Best for: Irregular gaps, older homes, custom installs.
- Materials needed: Scribe molding, saw, nails, hammer.
- Steps:
- Cut scribe molding to size.
- Shape the edge to fit wall contours.
- Attach and finish.
This technique is advanced, but it creates a professional look.
6. Diy Solutions: Foam, Wood, Or Plastic
Sometimes, budget or quick fixes are needed. You can use foam strips, wood shims, or plastic spacers.
- Best for: Temporary fixes, rental homes.
- Materials needed: Foam, wood, or plastic, glue, paint.
- Steps:
- Cut material to size.
- Glue or wedge into gap.
- Paint to match.
Not as durable, but useful if you plan to renovate soon.
Comparing Gap Cover Solutions
Choosing the right method depends on gap size, location, and your skill level. Here’s a quick comparison:
| Method | Gap Size | Durability | Appearance | Skill Needed |
|---|---|---|---|---|
| Caulk | Up to 1/4 inch | Good | Seamless | Beginner |
| Filler Strip | 1/4 to 1 inch | Excellent | Matches cabinet | Intermediate |
| Trim/Molding | Up to 1 inch | Excellent | Decorative | Intermediate |
| Backer Rod + Caulk | 1/2 inch and above | Very Good | Clean | Intermediate |
| Scribe Molding | Irregular | Excellent | Custom fit | Advanced |
| DIY Solutions | Any | Fair | Basic | Beginner |

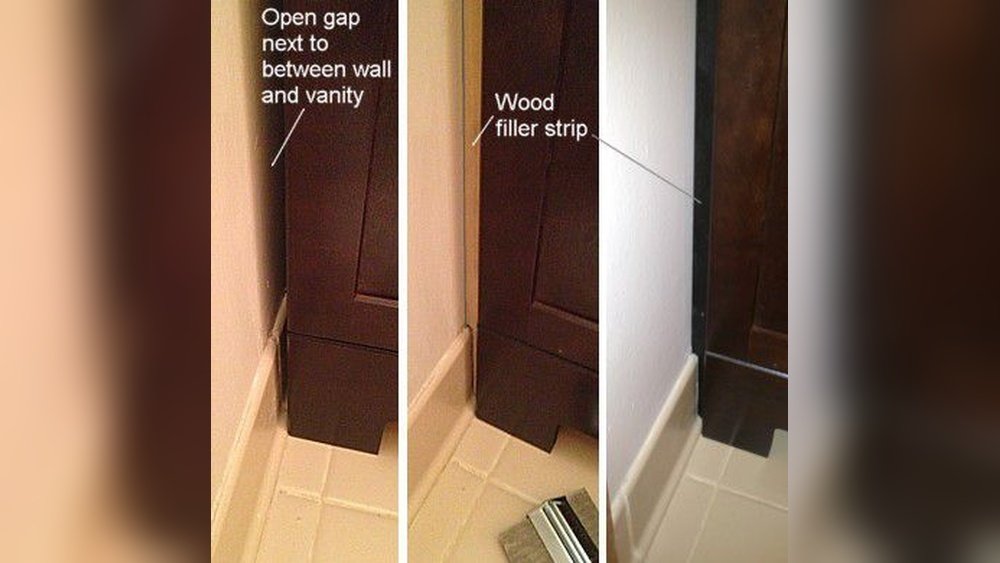
Credit: www.reddit.com
Materials And Tools Needed
You don’t need expensive tools for most gap fixes. Here’s a list of common materials:
- Caulk gun
- Painter’s caulk
- Filler strips
- Trim or molding
- Saw (hand or miter)
- Hammer and nails
- Paint or stain
- Masking tape
- Backer rod
If you’re unsure about which caulk or filler to use, ask at a hardware store or check product reviews.
Step-by-step Guide: Filling A Cabinet Gap With Caulk
Let’s walk through a typical process to fill a small gap:
- Clean the area with a damp cloth.
- Measure the gap width.
- Apply masking tape for clean edges.
- Load painter’s caulk into the gun.
- Squeeze a thin bead of caulk along the gap.
- Smooth with your finger or a caulk tool.
- Remove tape while caulk is wet.
- Wipe excess and let dry.
This method is fast and makes the gap nearly invisible.
Advanced Example: Installing A Filler Strip
If you have a larger gap, use a filler strip. Here’s how:
- Measure the gap height and width at several points.
- Buy a filler strip that matches your cabinet finish.
- Cut the strip with a miter saw for accuracy.
- Attach with screws or glue, making sure it’s flush.
- Fill any nail holes with wood filler.
- Touch up with paint or stain.
For a perfect match, ask for filler strips from the cabinet manufacturer.
Practical Tips And Common Mistakes
Covering cabinet gaps seems simple, but there are pitfalls:
- Don’t skip cleaning: Dust and grease prevent caulk or glue from sticking.
- Check for movement: If the cabinet moves, a rigid solution may crack.
- Choose paintable caulk: Not all caulk can be painted.
- Avoid overfilling: Too much caulk or filler looks messy.
- Match materials: Use wood with wood, laminate with laminate.
A non-obvious tip: For gaps near water sources, use mildew-resistant caulk. This prevents mold and keeps your kitchen healthy.
Another insight: In older homes, walls may shift over time. Flexible materials like caulk or scribe molding adapt better than rigid wood.

Credit: www.reddit.com
Real-life Example
A homeowner in Chicago had a 3/4-inch gap between their new cabinet and an uneven wall. They tried caulk, but it looked stretched and cracked. After switching to a filler strip stained to match the cabinet, the gap disappeared and the room looked professionally finished.
This shows that matching the solution to the gap size makes all the difference.
Estimated Costs And Time
Here’s a rough estimate for common methods:
| Method | Cost Range | Time Needed |
|---|---|---|
| Caulk | $10–$20 | 30–60 minutes |
| Filler Strip | $20–$50 | 1–2 hours |
| Trim/Molding | $15–$40 | 1–2 hours |
| Backer Rod + Caulk | $15–$25 | 45–90 minutes |
| Scribe Molding | $30–$60 | 2–3 hours |
| DIY Solutions | $5–$20 | 30–60 minutes |
Most fixes are affordable and can be done in one afternoon.
When To Call A Professional
Some gaps are tricky. If your cabinets are expensive, or the gap is very large and uneven, consider hiring a pro. A skilled carpenter can make custom filler strips or scribe molding for a flawless finish.
Signs you need help:
- Gap is wider than 1 inch.
- Cabinet is not level or stable.
- Wall is damaged or moldy.
- You don’t have the tools or skills.
Professional fixes cost more but last longer and look better.
Maintenance After Fixing Cabinet Gaps
Once you cover gaps, keep them in good shape:
- Inspect for cracks or movement every 6–12 months.
- Clean caulk and trim gently, avoiding harsh chemicals.
- Touch up paint or stain if needed.
- Watch for signs of pests or moisture.
Regular checks help your cabinets stay beautiful and functional.
Frequently Asked Questions
What Is The Easiest Way To Cover Small Gaps Between Cabinets And Wall?
The easiest way is to use painter’s caulk. Clean the area, apply a bead of caulk, smooth it, and let it dry. This works well for gaps less than 1/4 inch.
Can I Use Expanding Foam To Fill Cabinet Gaps?
Expanding foam is not recommended for visible gaps. It’s hard to trim and paint, and can create a messy look. Use foam only for hidden gaps behind cabinets.
How Do I Match Filler Strips To My Cabinet Color?
Buy strips from the cabinet manufacturer, or stain/paint wood strips to match. Take a cabinet door to the store for a color match. Some hardware stores offer custom matching.
Will Covering Gaps Affect Cabinet Ventilation?
Most gap covers do not block ventilation. If your cabinet needs airflow (for appliances), avoid sealing all gaps. Use trim or filler strips that leave a small space if needed.
Is It Possible To Fix Gaps Without Removing The Cabinet?
Yes, most solutions—caulk, filler strips, trim—can be applied without removing cabinets. Only major repairs, like wall leveling, may require cabinet removal.
Covering gaps between cabinets and wall is a straightforward project that makes a big impact. Whether you use caulk, filler strips, or trim, choosing the right method will give your kitchen or bathroom a polished, finished look. For more advanced tips and examples, visit Home Depot. Taking time to fix these gaps now can prevent problems and keep your home looking its best for years to come.