Are you ready to enjoy clean, pure drinking water straight from your tap? Installing a reverse osmosis (RO) drinking water system can seem tricky, but with the right guidance, you can do it yourself and save money.
Imagine never having to buy bottled water again, while knowing exactly what’s filtering into your glass. You’ll get simple, step-by-step instructions to install your RO system quickly and confidently—even if you’re new to plumbing. By the end, you’ll have fresh, great-tasting water at your fingertips and the satisfaction of a job well done.
Let’s get started!
:max_bytes(150000):strip_icc()/installing-a-reverse-osmosis-system-2718849-hero-4b9b0d7bbd3941eeb12d23d3ebd7296b.jpg)
Credit: www.thespruce.com
Tools And Materials Needed
Installing a reverse osmosis drinking water system requires specific tools and materials. Preparing these items before starting makes the process smoother. Understanding what you need helps avoid interruptions during installation. Safety is also important to protect yourself and your home.
Essential Tools
- Drill with appropriate drill bits for your countertop
- Screwdriver set (both flathead and Phillips)
- Adjustable wrench for tightening fittings
- Box cutter or utility knife for cutting tubing
- Plumber’s tape (Teflon tape) to seal threaded connections
- Measuring tape to ensure proper placement
- Bucket or towel to catch any water spills
Parts And Components
- Reverse osmosis filter unit with pre-filters and membrane
- Dedicated faucet for purified water
- Storage tank to hold filtered water
- Tubing to connect all components
- Drain saddle clamp for wastewater line connection
- Feed water valve to connect to your cold water supply
- Mounting brackets or clips to secure the system
Safety Precautions
- Turn off the main water supply before starting installation
- Wear gloves to protect your hands from sharp edges
- Use eye protection when drilling into countertops
- Check for electrical outlets or pipes before drilling
- Work in a dry area to avoid slips or electric shocks
- Follow manufacturer instructions closely for safe setup
Preparing For Installation
Preparing for the installation of your reverse osmosis drinking water system sets the stage for a smooth process. Taking time to prepare ensures you avoid common mistakes. It also helps you organize tools and materials before starting.
Clear understanding of the steps makes installation faster and easier. Focus on three key areas before you begin: shutting off the water supply, choosing the faucet location, and clearing the under-sink area. Each step plays a vital role in a successful setup.
Shutting Off Water Supply
Locate the cold water valve under the sink. Turn the valve clockwise to close it completely. This stops water flow and prevents leaks during installation. Open the faucet to release any remaining water pressure. Keep a towel nearby to catch drips.
Choosing Faucet Location
Select a spot on your sink or countertop for the new faucet. Pick a location near the existing faucet for easy access. Ensure there is enough space for the reverse osmosis faucet. Avoid placing it where it will block other fixtures or drawers.
Clearing Under-sink Area
Remove all items stored under the sink. This creates room to work comfortably. Check for any pipes or obstructions that may interfere. Clean the space to avoid dust and dirt entering the system. Organizing this area helps prevent mistakes during installation.
Installing The Ro Faucet
Installing the RO faucet is an important step in setting up your reverse osmosis system. This faucet delivers clean, filtered water right to your sink. Proper installation ensures no leaks and easy access for drinking and cooking.
The process involves drilling a hole if your countertop lacks one, mounting the faucet securely, and connecting the water lines properly. Each step needs care for a safe and lasting setup.
Drilling The Faucet Hole
Check if your sink or countertop has a pre-drilled hole. Most kitchen sinks have extra holes for accessories.
If no hole exists, select a suitable spot near your sink. Use a drill with the correct bit size for the faucet base.
Wear safety glasses and drill slowly to avoid cracking the surface. Clean the area well after drilling.
Mounting The Faucet
Place the faucet base into the hole. Align it so the handle moves freely and faces you.
Under the sink, slide the rubber gasket and metal washer onto the faucet stem.
Tighten the mounting nut by hand, then use a wrench to secure it firmly. Avoid overtightening to prevent damage.
Securing Faucet Connections
Attach the RO system’s tubing to the faucet’s inlet. Push the tubing firmly into the quick-connect fitting.
Use plumber’s tape on threaded connections to prevent leaks. Tighten all fittings snugly.
Check all connections for leaks by turning on the water supply slowly. Fix any drips immediately.
:max_bytes(150000):strip_icc()/installing-a-reverse-osmosis-system-2718849-hero-4b9b0d7bbd3941eeb12d23d3ebd7296b.jpg)
Credit: www.thespruce.com
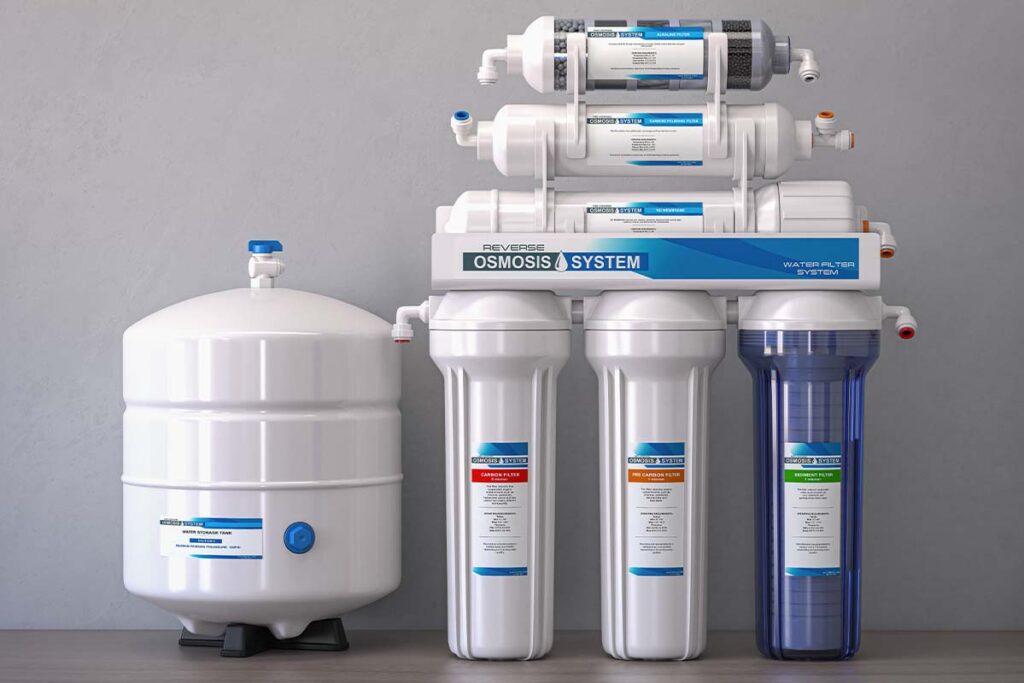
Mounting The Ro System
Mounting the reverse osmosis (RO) system properly is key for efficient operation. This step ensures stability and easy access for filter changes. A well-mounted unit prevents leaks and damage.
Follow these simple steps to secure your RO system firmly under the sink or in your chosen location.
Positioning The Ro Unit
Place the RO unit near the water source and drain. Leave enough space to access filters for maintenance. Avoid tight spots that block air circulation. A flat surface helps keep the system stable. Position it low enough for easy filter replacement.
Installing The Storage Tank
Find a spot close to the RO unit for the storage tank. Keep the tank upright on a flat surface. Avoid placing it on soft or uneven ground. This prevents tipping and damage. Ensure the tank valve is easy to reach. Connect the tank to the RO unit using the included tubing.
Attaching Mounting Brackets
Use the mounting brackets provided with your system. Mark the bracket positions on the wall or cabinet side. Drill pilot holes to make installation easier. Secure brackets with screws and anchors if needed. Hang the RO unit on the brackets carefully. Check the unit is firmly attached and stable.
Connecting Water Lines
Connecting water lines is a key step in installing your reverse osmosis (RO) drinking water system. This process links your home’s water supply to the RO unit. It also connects the unit to the drain for wastewater disposal. Clear, secure connections prevent leaks and ensure clean water flow. Follow these steps carefully to set up your water lines correctly.
Attaching Feed Water Valve
Locate the cold water supply line under your sink. Turn off the main water supply first. Attach the feed water valve to this line. Use plumber’s tape on the threads for a tight seal. Tighten the valve with a wrench but avoid over-tightening. This valve will control water flow into your RO system.
Running Tubing To Ro Unit
Cut the tubing to the needed length using a sharp cutter. Connect one end to the feed water valve. Push the tubing firmly into the valve fitting. Route the tubing neatly to the RO unit. Avoid sharp bends or kinks that can block water flow. Secure tubing with clips to keep it in place.
Connecting To Drain Line
Find the drain saddle clamp included with your system. Choose a spot on the drain pipe near your sink. Drill a small hole in the pipe as instructed. Attach the saddle clamp over the hole. Insert the drain tubing from the RO unit into the clamp. Tighten the clamp to prevent leaks. This allows wastewater to exit safely.
Credit: coloradowaterpurification.com
Final Steps
After installing your reverse osmosis system, several final steps ensure it works well. These steps help keep your water clean and the system running smoothly. Take your time to complete them carefully.
Checking For Leaks
Turn on the water supply slowly. Watch all connections and joints closely. Look for any drips or wet spots. Tighten fittings if you see leaks. Do not ignore small leaks; they can cause damage. Check again after a few minutes to be sure.
Flushing The System
Open the RO faucet fully. Let water run for 10 to 15 minutes. This flushes out any dust or loose particles. Do not drink this water yet. Flushing prepares the filters for clean water. It also helps the system start working properly.
Testing Water Quality
Use a TDS meter or water test kit. Collect water from the RO faucet. Check for total dissolved solids (TDS) and taste. The TDS should be much lower than your tap water. If water tastes good and TDS is low, the system works well. Repeat testing every few months for best results.
Troubleshooting Tips
Troubleshooting is key to a smooth reverse osmosis system installation. Small problems may arise but can be fixed easily. Knowing common issues and solutions saves time and effort. Here are useful tips to help you troubleshoot your new system.
Common Installation Issues
Leaks often occur due to loose fittings or damaged parts. Check all connections and tighten them carefully. Use plumber’s tape on threaded joints to stop leaks. Make sure the tubing is cut clean and pushed fully into fittings. Avoid kinks or bends that block water flow. Check the filter housing for cracks or misalignment.
Fixing Leaks
Identify the leak source by drying the system and watching for water drops. Tighten fittings by hand first, then use a wrench gently. Replace worn or cracked O-rings inside filter housings. Use new tubing if old ones are damaged. Do not overtighten, as this can cause cracks. Test the system by running water and inspect for leaks again.
Addressing Low Water Flow
Low flow may be due to clogged filters or blocked tubes. Replace filters that have been in use for more than six months. Check for debris in the membrane or filters. Ensure the water pressure meets the system’s requirements. Remove any sharp bends or kinks in the tubing. Flush the system to clear air or blockages before use.
Advantages Of Diy Installation
Installing a reverse osmosis drinking water system by yourself has many benefits. Choosing DIY installation lets you control the process from start to finish. It saves money and offers a great chance to learn about your home’s plumbing. You can work at your own pace without waiting for a professional. Below are some key advantages of doing the installation yourself.
Cost Savings
Doing the installation yourself cuts out labor costs. Hiring a plumber can be expensive. With DIY, you only pay for the parts and tools. This makes the whole project much cheaper. Saving money on installation leaves more budget for quality filters. Also, you avoid extra fees for emergency or rush jobs.
Learning Experience
Installing the system teaches you basic plumbing skills. You learn how water lines and filters work together. This knowledge helps with future repairs or upgrades. Understanding your system improves confidence in handling water issues. The hands-on experience is valuable and satisfying.
Scheduling Flexibility
DIY installation lets you choose your own time. No need to wait for a plumber’s availability. You can start and finish the project on your schedule. This flexibility is great for busy households. It avoids delays and fits easily into your daily routine.
When To Seek Professional Help
Installing a reverse osmosis drinking water system can be rewarding and cost-effective. Some installations are straightforward and manageable for many homeowners. Yet, certain situations require professional skills. Knowing when to seek expert help saves time and prevents damage. It ensures your system works correctly and safely.
Complex Plumbing Setups
Complex plumbing makes installation difficult. Older homes or unique pipe layouts can confuse DIY attempts. Professionals understand how to navigate tricky plumbing. They avoid leaks and ensure proper connections. Complex setups may need special tools or permits. Experts handle these challenges with ease and confidence.
Unfamiliar With Tools
Using tools incorrectly can cause damage or injury. Drills, wrenches, and cutters are common but need care. Professionals have experience with all necessary tools. They work efficiently and safely, minimizing risks. If you feel unsure about tool use, call a plumber. It saves frustration and protects your home.
Ensuring System Performance
Proper installation affects water quality and system lifespan. Incorrect setup can cause leaks, low pressure, or poor filtration. Experts test the system to confirm peak performance. They check connections, pressure levels, and filter function. Professional installation offers peace of mind and reliable clean water.
Frequently Asked Questions
Can I Install A Reverse Osmosis System Myself?
Yes, you can install a reverse osmosis system yourself. It requires basic plumbing skills, tools, and patience. Follow instructions carefully to connect water lines, install the faucet, and check for leaks. DIY saves money and teaches system maintenance, but complex setups may need professional help for best results.
What Is The Downside Of Reverse Osmosis?
The downside of reverse osmosis includes water wastage and slower filtration speed. It also removes beneficial minerals and requires regular maintenance.
How Much Does A Plumber Charge To Install A Reverse Osmosis System?
A plumber typically charges $150 to $300 to install a reverse osmosis system. Prices vary by location and complexity.
Is Ro Safe For Kidneys?
RO water is safe for kidneys as it removes harmful contaminants. It provides clean, purified water without stressing kidney function. Drinking RO water regularly supports kidney health by reducing toxin intake.
Conclusion
Installing a reverse osmosis system improves your water quality at home. The process takes some tools, time, and basic plumbing skills. Follow each step carefully to avoid leaks and issues. Test your system well before regular use. Clean, fresh water becomes easily accessible with your new setup.
Maintenance keeps the system working smoothly for years. Enjoy healthier drinking water right from your tap every day.