Are you ready to tackle your next home improvement project with confidence? Knowing how to use a silicone caulk gun can save you time, money, and frustration.
Whether you’re sealing gaps around windows, fixing leaks, or adding a polished finish to your bathroom, mastering this simple tool will make a huge difference. In this guide, you’ll discover easy steps and insider tips that anyone can follow. Stick with me, and soon you’ll be applying silicone like a pro—no mess, no stress.
Let’s get started!
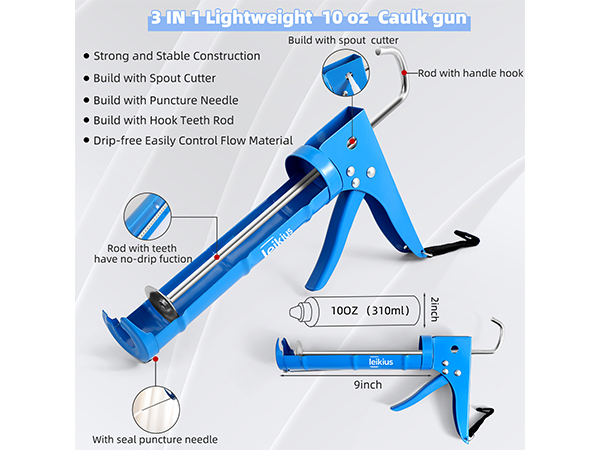
Credit: www.amazon.com
Choosing The Right Silicone Caulk
Choosing the right silicone caulk is key for a successful project. Different tasks need different types of caulk. Selecting the correct one saves time and prevents future problems. Understanding your options helps you pick the best fit.
Types Of Silicone Caulk
Silicone caulk comes in many types. General-purpose silicone works for most jobs. Kitchen and bath silicone is mold-resistant and waterproof. High-temperature silicone withstands heat near stoves or ovens. Clear silicone is good for glass and windows. Each type has a specific use. Pick one that matches your project needs.
Selecting Based On Application
Think about where you will apply the caulk. For wet areas, choose mold-resistant silicone. Outdoor use needs weatherproof and UV-resistant caulk. For sealing glass or mirrors, clear silicone is best. For heat protection, use high-temp silicone. Match the caulk to the surface and conditions. This ensures durability and strong sealing.
Safety And Quality Tips
Check for non-toxic and low-VOC labels. Good quality caulk lasts longer and does not crack. Store caulk in a cool, dry place before use. Always wear gloves to protect your skin. Work in a well-ventilated area to avoid fumes. Using safe, quality caulk protects your health and the environment.
Preparing The Surface
Preparing the surface is the first step before applying silicone caulk with a caulk gun. This step ensures the caulk sticks well and lasts longer. A clean and dry surface helps the silicone bond properly. This prevents gaps and keeps water and air from leaking through.
Cleaning The Area
Start by wiping the area with a damp cloth. Remove dirt, dust, and grease. Use soap and water for stubborn grime. Avoid using harsh chemicals that can damage the surface. Clean surfaces help silicone adhere better.
Removing Old Caulk
Scrape off old caulk using a putty knife or caulk remover tool. Be careful not to damage the edges. Old caulk can cause new silicone to peel off. Remove every bit for a smooth finish.
Drying And Masking
Let the cleaned area dry completely. Moisture can stop silicone from sticking properly. Use painter’s tape to mask the edges. This keeps the caulk line neat and straight. Remove the tape before the silicone fully cures.
Setting Up The Caulk Gun
Setting up a silicone caulk gun is the first step for a smooth project. Proper setup makes the job easier and cleaner. Take time to prepare your tool well.
Loading The Silicone Tube
Pull the plunger back fully to open space for the tube. Insert the silicone tube into the gun with the nozzle facing forward. Push the tube in until it fits tightly. Cut the tip of the silicone tube at a 45-degree angle. This allows the right amount of caulk to flow out.
Adjusting The Pressure
Check the pressure control on the gun. Adjust it to a low setting for thin lines. Increase the pressure for wider beads of silicone. Too much pressure causes messy, uneven caulk. Find a balance for smooth, steady flow.
Testing The Flow
Squeeze the trigger slowly to test the caulk flow. Watch the silicone come out of the nozzle. Stop if the flow is too fast or too slow. Adjust pressure or cut a smaller tip if needed. Practice on scrap material to avoid mistakes on your project.
Applying The Silicone Caulk
Applying silicone caulk correctly ensures a clean, smooth finish. This step is key to sealing gaps and preventing water leaks. Careful technique helps the caulk stick well and look neat. Below are simple tips for applying silicone caulk with a caulk gun.
Starting The Bead
Cut the tip of the caulk tube at a 45-degree angle. Make the hole size match the gap width. Place the caulk gun tip at the start of the joint. Squeeze the trigger gently to begin the flow. Move the gun slowly forward as the caulk comes out. This helps create a continuous bead without breaks.
Maintaining A Steady Flow
Keep steady pressure on the trigger to avoid gaps. A smooth, even bead looks professional and seals well. Pause squeezing if the bead gets too thick or uneven. Restart with the same steady pressure to fix it. Smooth flow also saves caulk and reduces mess.
Controlling The Speed And Angle
Hold the gun at a 45-degree angle to the surface. This angle helps the caulk fill the joint fully. Move the gun at a moderate, even speed. Too fast creates thin, weak beads. Too slow causes lumps and excess caulk. Practice speed and angle for the best results.
Smoothing And Finishing
Smoothing and finishing the silicone caulk is the key to a neat and professional look. It helps the caulk stick better and stops water from leaking. A smooth finish also makes the surface easy to clean and keeps it looking good for longer.
Timing is important. Smooth the caulk before it starts to dry. This step shapes the bead and removes air bubbles. It also pushes the caulk firmly into gaps and cracks.
Using A Caulk Smoother Or Finger
Use a caulk smoother tool or your finger to smooth the bead. Wet the tool or finger with water or soapy water. This stops the caulk from sticking.
Run the smoother or finger along the caulk bead in one steady motion. Apply gentle pressure to shape the caulk and press it into the joint. Wipe the tool or finger after each pass to keep it clean.
Removing Excess Caulk
Remove extra caulk quickly before it dries. Use a damp cloth or paper towel to wipe away excess. Be careful not to disturb the smooth bead.
For dried caulk, use a utility knife or scraper to cut and peel it off gently. Avoid scratching or damaging the surface below.
Cleaning Tools And Hands
Clean your tools and hands right after finishing. Use warm soapy water for water-based silicone. For silicone that is not water-based, use mineral spirits or a special caulk remover.
Dry tools fully before storing them. This keeps them ready for next use and stops damage.
Drying And Curing Time
After applying silicone caulk, drying and curing time is very important. This step makes sure the seal holds strong and lasts long. Rushing this process can cause leaks or weak spots. Understanding how long to wait and what to watch for helps get the best results.
Recommended Waiting Period
Silicone caulk usually needs 24 hours to dry completely. Some types may take up to 48 hours. Check the product label for exact times. Keep the area dry during this period. Avoid touching or moving the caulk until it hardens.
Avoiding Disturbances
Do not disturb the caulk while it cures. Any movement can cause cracks or gaps. Keep pets and children away from the sealed area. Avoid cleaning or spraying water on the caulk during drying. Let it set in a place with stable temperature.
Signs Of Proper Seal
The caulk looks firm and smooth when it is ready. It will not feel sticky or soft. The color stays the same without any shiny wet spots. Gently press the caulk to test hardness. If it resists pressure, it is fully cured and sealed.
Common Mistakes To Avoid
Using a silicone caulk gun might seem simple, but many make common errors. These mistakes reduce the quality and durability of your work. Avoiding these errors ensures a neat, long-lasting finish. Below are common pitfalls to watch out for.
Uneven Application
Applying silicone unevenly creates a messy look. It can cause gaps and weak spots. Hold the gun steady and move at a constant speed. Practice helps maintain an even bead. Avoid jerky movements that cause lumps or thin lines.
Applying Too Much Or Too Little
Too much silicone wastes material and looks sloppy. It can be hard to clean up and may not dry properly. Too little won’t seal the gap well. Apply just enough to fill the space fully. Aim for a smooth, continuous line without excess.
Ignoring Surface Preparation
Skipping surface cleaning leads to poor adhesion. Dirt, dust, or moisture stops silicone from sticking. Clean and dry the area before applying caulk. Use a cloth or brush to remove debris. Proper prep ensures the silicone bonds well and lasts longer.

Credit: www.reddit.com
Credit: www.familyhandyman.com
Frequently Asked Questions
What Is The Best Way To Load Silicone Caulk In A Gun?
To load silicone caulk, cut the tube’s tip at a 45-degree angle. Insert the tube into the caulk gun’s frame. Push the plunger until it fits snugly against the tube’s bottom. This ensures smooth and controlled application of the caulk.
How Do I Apply Silicone Caulk Evenly With A Gun?
Apply steady pressure on the trigger to release the caulk. Move the gun slowly along the seam, keeping a consistent speed. Use a wet finger or smoothing tool immediately after to create a smooth, even bead without gaps.
Can Silicone Caulk Gun Be Used For Outdoor Projects?
Yes, silicone caulk guns are perfect for outdoor use. Silicone caulk is weather-resistant and flexible. It seals gaps on windows, doors, and siding effectively, preventing water and air leaks in various weather conditions.
How Do I Clean A Silicone Caulk Gun After Use?
Remove the tube from the gun after use. Wipe off excess caulk with a paper towel or cloth. Use mineral spirits or rubbing alcohol to clean the nozzle and gun parts. Proper cleaning extends the gun’s lifespan.
Conclusion
Using a silicone caulk gun is simple and useful. Prepare the surface well before applying caulk. Cut the tube tip at an angle for better control. Squeeze the trigger steadily to get an even flow. Smooth the caulk line with a finger or tool.
Clean any excess immediately to keep a neat finish. With practice, your seals will look clean and last longer. Keep these steps in mind for your next project. You can handle caulking like a pro in no time.