Have you ever faced the challenge of needing a perfectly round hole, only to find your drill can’t quite cut it? If so, you’re not alone.
Many DIY enthusiasts and professionals alike have struggled with this task. Fortunately, there’s a simple tool that can make this job a breeze: the hole saw. By using a hole saw on your drill, you can achieve clean, precise holes effortlessly.
But how do you use it effectively without damaging your material or your drill? In this guide, we’ll walk you through the step-by-step process of mastering the hole saw technique. With just a few tips and tricks, you’ll be ready to tackle your next project with confidence. Ready to transform your drilling skills? Let’s dive in and unlock the secrets of the hole saw!
Choosing The Right Hole Saw
Choosing the right hole saw for your drill is crucial. It ensures efficiency and safety during your project. Each task requires a specific tool. Let’s explore how to select the perfect hole saw.
Material Compatibility
Consider the material you are cutting. Different materials require different types of hole saws. Metal needs a bi-metal saw. Wood works well with carbide-tipped saws. Check the packaging for material compatibility. This avoids damage and prolongs the tool’s life.
Size Selection
Size is vital for precision. Measure the diameter of the hole needed. Choose a hole saw that matches this size. Common sizes range from 3/4-inch to 5 inches. Accurate size selection prevents errors. It saves time and reduces waste.
Quality And Durability
High-quality hole saws last longer. They cut cleaner and require less effort. Look for brands known for durability. Read reviews for user experiences. Durable tools withstand frequent use. They offer better value over time.
Preparing Your Drill
Before diving into your next DIY project with a hole saw, it’s essential to ensure your drill is properly prepared. A well-prepared drill means smoother operations, fewer mishaps, and a cleaner finish. Just like a chef checks their tools before cooking, you should examine yours before drilling. Let’s get your drill ready!
Selecting The Right Drill
Not all drills are created equal. If you’re using a hole saw, choose a drill with enough power to handle the task. Cordless drills are convenient, but ensure they have enough torque. A drill with variable speed settings is ideal. Remember the time when I used a low-power drill and ended up with a jagged hole? Learn from my mistake. Make sure your drill is compatible with your hole saw’s arbor size.
Ensuring Proper Speed
Speed matters! Too fast and you might burn the material; too slow and the hole won’t be smooth. For drilling through wood, start at a moderate speed. For metal, go slower to avoid overheating. A quick tip: Test on scrap material first. This can save you from costly errors. Are you ready to find that perfect speed?
Checking Battery Or Power Supply
A drill without power is like a car without fuel. Check your battery or power supply before starting. If you’re using a cordless drill, ensure the battery is fully charged. For corded drills, check the outlet and cord for any damage. This step might seem minor, but it’s crucial. Just imagine starting your project and the drill stops midway because of a power issue. Keep your power steady, and you’re halfway there!
Preparing your drill might seem like an extra step, but it’s the foundation for a successful drilling experience. You wouldn’t skip brushing your teeth, so why skip this? Take these steps to heart, and you’ll be ready to make precise holes effortlessly.
Safety Precautions
Using a hole saw on a drill requires caution and careful handling. Ensuring safety is crucial to prevent injuries and accidents. Let’s explore key safety precautions to follow during this task.
Wearing Protective Gear
Always wear protective gear while using a drill. Safety glasses protect your eyes from flying debris. Gloves safeguard your hands from cuts and bruises. Consider using ear protection. Drills can be noisy and may harm your hearing over time.
Securing The Workpiece
Ensure the workpiece is securely clamped. A loose workpiece can lead to accidents. Use a sturdy workbench or a vice to hold it in place. A stable setup helps in achieving clean and precise cuts.
Avoiding Overheating
Overheating can damage both the drill and the hole saw. Use a moderate speed setting on the drill. Avoid applying too much pressure. Take breaks to let the drill cool down. This prolongs the life of your tools and ensures safety.
Marking The Drilling Spot
Marking the drilling spot is crucial for precise hole drilling. Accurate marking ensures the hole saw cuts exactly where intended. This section will guide you through effective techniques for marking the drilling spot.
Using A Template
A template can help maintain consistency in marking. Place the template over the surface. Align it carefully with the intended drilling spot. Trace the outline using a pencil or marker. This method is ideal for repetitive drilling tasks.
Center Punch Technique
The center punch technique provides an initial indentation. Place the punch at the exact center of the drilling spot. Strike the punch with a hammer to create a small dent. This guides the drill and prevents slipping.
Measuring For Accuracy
Accurate measurement is vital for precise drilling. Use a ruler or measuring tape to mark distances. Ensure the spot aligns with your project requirements. Double-check measurements before drilling to avoid mistakes.
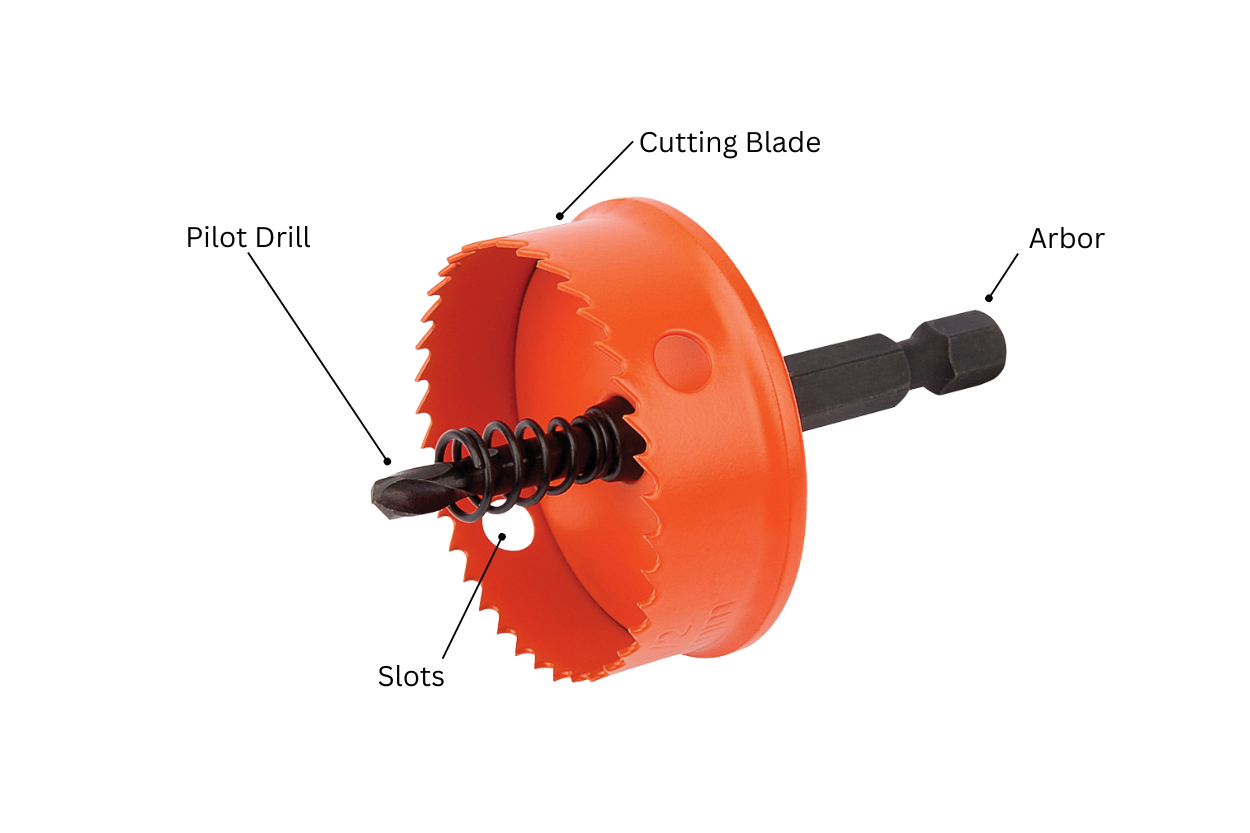
Mounting The Hole Saw
Mount the hole saw by securely attaching it to the drill’s arbor. Ensure the teeth face outward. Tighten the arbor nut using a wrench, ensuring a firm grip. This setup prevents slipping during operation and ensures precise cuts. Proper alignment is crucial for efficient use and safety.
Mounting a hole saw onto your drill might seem like a straightforward task, but taking a few minutes to do it right can save you from a lot of frustration later. Whether you’re creating a new fixture for your kitchen or working on a DIY project, ensuring the hole saw is securely mounted is crucial. Not only does this step affect the precision of your cut, but it also influences your safety. Let’s dive into the essential steps involved in mounting the hole saw.Attaching To The Arbor
Start by attaching the hole saw to the arbor, which is the metal piece that connects the saw to the drill. Align the hole saw with the threads of the arbor and twist it clockwise. You might find it helpful to use a wrench for an extra snug fit. Ensure that the hole saw is fully screwed onto the arbor. A loose connection can lead to wobbling and uneven cuts. Remember, a steady hand starts with a steady tool.Securing The Pilot Bit
The pilot bit is your guide and ensures that the hole saw stays on course. Slide the pilot bit through the center of the arbor until it protrudes slightly from the saw’s edge. This small yet significant step anchors your cut. Tighten the set screw on the side of the arbor to secure the pilot bit in place. This prevents the bit from slipping during drilling. Imagine trying to cook with a wobbly pan—frustrating, right? The same goes for drilling with a loose pilot bit.Tightening And Testing
Once everything is in place, it’s time to tighten. Use a wrench to ensure all components are firmly secured. This not only guarantees a clean cut but also keeps you safe. Before you start drilling, give it a test spin. Hold the drill up and run it at a low speed. Watch for any wobbling or irregular movement. A quick test can save you from a crooked cut or worse, a damaged surface. Mounting a hole saw correctly is more than just a task; it’s the foundation for your project. Taking a few extra minutes to ensure everything is secure makes all the difference. Are you ready to make that perfect cut?
Credit: www.youtube.com
Drilling Techniques
Drilling with a hole saw can be a game-changer for many DIY projects. Whether you’re working on wood, metal, or plastic, mastering the right techniques can make all the difference. You want precision and smooth edges, right? Let’s dive into the drilling techniques that will help you achieve just that.
Starting Slowly
Don’t rush in. Starting slowly is crucial when using a hole saw. It helps you maintain control and prevents the saw from jumping or wandering off course. Engage the drill at a low speed initially, allowing the teeth to gently bite into the surface.
Imagine you’re easing into a conversation with a new friend. You wouldn’t blurt out everything at once, would you? Similarly, let the hole saw gradually make its mark. You’ll notice how this simple step sets the stage for a clean and precise cut.
Applying Consistent Pressure
Pressure is key. But it’s about consistency, not force. Applying consistent pressure ensures the hole saw cuts evenly. Too much force can overheat and dull the blade, while too little can cause uneven cuts.
Visualize it like kneading dough—steady, even pressure allows for a smooth result. You’ll find that your cuts come out cleaner and more professional-looking. This approach is essential for maintaining the integrity of both the saw and the material.
Handling Different Materials
Different materials require different handling. Wood, for example, is more forgiving than metal or plastic. When drilling wood, a slower speed and lighter pressure can prevent splintering. Metal demands a higher speed but gentle pressure to avoid overheating.
Plastic can be tricky. It can melt if the drill speed is too high. Adjust your technique based on the material, and don’t be afraid to experiment. What works for one might need a tweak for another. Are you considering the nuances of your materials before you drill?
Drilling with a hole saw doesn’t need to be daunting. By starting slowly, applying consistent pressure, and handling different materials thoughtfully, you can achieve precise and clean cuts. The real question is, are you ready to put these techniques to the test and elevate your DIY game?
Clearing Debris
Clearing debris is essential when using a hole saw on a drill. Debris can cause the tool to jam or overheat. Ensuring a clean cutting path enhances efficiency. It also prevents damage to both the tool and material.
Pausing For Removal
Take breaks to clear debris from the cutting area. Stopping allows you to remove wood chips or metal shavings. Use a brush or cloth for quick removal. Avoid using your fingers to prevent injury. Regular pauses keep the tool running smoothly.
Using Lubricants
Lubricants help in reducing friction during drilling. Apply oil or lubricant on the saw teeth. This minimizes heat and prevents debris from sticking. It also extends the life of your hole saw. Use sparingly to avoid excess buildup.
Maintaining Visibility
Ensure you can see the cutting path clearly. Wipe away debris often to maintain visibility. This helps in aligning the drill accurately. A clear view prevents mistakes and improves precision. Use a flashlight if needed for better illumination.
Credit: www.redboxtools.com
Troubleshooting Common Issues
Using a hole saw on a drill can be tricky without proper guidance. First, ensure the drill is in good condition. Then, attach the hole saw securely. Always start drilling at a slow speed to maintain control. If the saw gets stuck, stop and clear debris.
Safety gear is essential during this process.
Using a hole saw on a drill can be a straightforward task, but like any DIY project, it can come with its own set of challenges. Whether you’re a beginner or a seasoned pro, encountering issues is part of the learning process. The key is knowing how to troubleshoot these common problems to keep your project on track and achieve the cleanest cuts possible. Below, we’ll dive into some typical issues you might face and how to resolve them effectively.Dealing With Stuck Bits
There’s nothing more frustrating than a stuck bit right in the middle of a job. It happens when the saw teeth grab the material too tightly, usually due to high-speed drilling. To fix this, try reversing the drill slowly to release the bit. Applying a lubricant like WD-40 can also help loosen it up. Remember, patience is key—forceful removal can damage both the bit and your material.Fixing Uneven Holes
Uneven holes can ruin the aesthetic of your project and compromise structural integrity. This often occurs when the drill isn’t held steady or the pilot bit isn’t centered properly. Ensure your drill is perpendicular to the surface and apply consistent pressure. Consider using a drill guide for more precision. Practice on scrap material to perfect your technique before tackling the main project.Adjusting For Vibrations
Excessive vibrations can be both annoying and damaging. They lead to rough cuts and wear out your drill prematurely. To minimize vibrations, make sure the drill bit is securely fastened. If you’re still experiencing issues, check if the bit is bent or the material is too thin. Sometimes, simply adjusting your grip on the drill can make a significant difference. Have you ever faced a stubborn issue with your hole saw that seemed impossible to fix? Share your thoughts or solutions in the comments below. Your experience might just be the advice someone else is looking for.Maintaining Your Hole Saw
Using a hole saw on a drill requires careful handling to ensure smooth cuts. Secure the material firmly, and align the hole saw with the drill’s center. Apply steady pressure while drilling to avoid wobbling. Regular maintenance, such as cleaning and lubricating the hole saw, extends its lifespan and ensures efficient performance.
Maintaining your hole saw is crucial for extending its life and ensuring optimal performance. You might overlook this aspect, but proper care can make a significant difference in how well your tool serves you. Imagine the frustration of a dull blade slowing your progress or a rusty saw that just won’t cut right. Let’s dive into some practical tips that will keep your hole saw in top shape.Cleaning After Use
After each use, take a few minutes to clean your hole saw. Wipe off any debris or dust using a soft cloth. If there’s stubborn material stuck in the teeth, use a brush to gently remove it. You don’t want residue to harden over time, affecting the next use. Consider how much smoother your next project will go with a clean blade.Sharpening Tips
A sharp hole saw is your best friend. Periodically check the teeth for dullness. Use a small file to sharpen them, ensuring each tooth maintains its edge. Have you ever tried cutting with a blunt saw? It’s frustrating and can ruin your material. Keeping the teeth sharp guarantees cleaner cuts and less effort on your part.Proper Storage
Storing your hole saw correctly prevents damage. Keep it in a dry place to avoid rust. You can use a toolbox or hang it on a pegboard. Have you ever misplaced a tool in a cluttered drawer? Proper organization saves you time and keeps your tools in good condition. It’s worth investing in a storage solution that keeps everything accessible and safe. Maintaining your hole saw isn’t just about keeping it functional; it’s about ensuring every project you tackle is smoother and more efficient. How do you care for your tools? Could a little extra attention transform your DIY experience?
Credit: build-basic.com
Frequently Asked Questions
How To Put A Hole Saw On A Drill?
Attach the arbor to the drill chuck securely. Screw the hole saw onto the arbor tightly. Ensure it’s aligned properly. Lock the drill bit in place with a click. Test the setup by spinning the drill. Confirm stability before starting your project.
Follow safety precautions while using the tool.
Can I Use A Hole Saw With Any Drill?
Not all drills can accommodate a hole saw. Ensure your drill has enough power and the correct chuck size. Use a drill with a 3/8 inch or larger chuck, and preferably a corded or high-powered cordless model for best results.
Always check compatibility before use.
Do You Need A Special Drill For A Hole Saw?
You don’t need a special drill for a hole saw. A standard power drill works well. Ensure it has enough power and the correct arbor size. Some materials may require more torque, so a corded drill might be better for tougher jobs.
How To Open A Hole With A Drill?
To drill a hole, secure the material and mark the spot. Use the appropriate drill bit. Hold the drill perpendicular and apply steady pressure. Start at a low speed to create a guide hole, then increase speed. Ensure your drill bit suits the material for clean results.
Conclusion
Using a hole saw on a drill is simple and effective. Start by selecting the correct saw size for your project. Secure the material firmly to avoid movement. Use steady pressure while drilling, ensuring a clean cut. Always prioritize safety by wearing protective gear.
Keep your tools well-maintained for the best results. Practice makes perfect, so don’t hesitate to try a few test cuts. Remember, patience and precision are key. Enjoy your drilling projects with confidence, knowing you have the right skills. Happy drilling!