Are you ready to tackle those annoying gaps and cracks around your home but unsure how to use a caulk gun? You’re not alone.
Using a caulk gun might seem tricky at first, but once you know the simple steps, it becomes an easy and satisfying task. Imagine sealing leaks, preventing drafts, and giving your space a clean, finished look—all by yourself. In this guide, you’ll learn exactly how to handle a caulk gun like a pro, so you can save money, improve your home’s comfort, and enjoy the pride of doing it yourself.
Keep reading, and you’ll master this handy tool in no time.
Choosing The Right Caulk
Choosing the right caulk is important for a clean and lasting finish. Using the proper type helps seal gaps and stops water or air leaks. This choice depends on the project and the surfaces involved. Understanding different caulk materials, matching them to surfaces, and picking the right color and finish ensures good results.
Types Of Caulk Materials
Caulk comes in several materials. Silicone caulk is flexible and waterproof. It works well in bathrooms and kitchens. Acrylic latex caulk is easy to apply and clean. It paints well and suits indoor use. Polyurethane caulk is strong and good for outdoor projects. Each type fits different needs and environments.
Matching Caulk To Surfaces
Different surfaces need specific caulk types. Wood needs caulk that can stretch with movement. Masonry requires durable, weather-resistant caulk. Glass and metal need waterproof silicone caulk. Using the right caulk prevents cracks and peeling. Check the surface before buying caulk.
Color And Finish Options
Caulk comes in many colors. White and clear are common and blend well. Colored caulk matches paint or surface color. Finishes include matte or glossy. Choose a finish that fits the look of the area. Proper color and finish make the caulk less visible and neat.
Credit: www.familyhandyman.com
Preparing The Surface
Preparing the surface is a key step before using a caulk gun. It helps the caulk stick better and last longer. A clean, dry, and smooth surface prevents peeling and cracking. Follow these simple steps to get your area ready.
Cleaning And Drying
Start by cleaning the surface thoroughly. Use a brush or cloth to remove dust and dirt. Soap and water work well for most areas. Rinse the surface and let it dry completely. Moisture can stop the caulk from sticking properly.
Removing Old Caulk
Old caulk must be removed before applying new caulk. Use a putty knife or caulk remover tool to scrape it off gently. Avoid damaging the surface underneath. Make sure no bits of old caulk remain. This step ensures a smooth and even finish.
Masking For Clean Lines
Apply painter’s tape along the edges where you will caulk. This helps create straight and clean lines. Press the tape firmly to prevent caulk from seeping underneath. After caulking, remove the tape while the caulk is still wet. This step gives a neat and professional look.
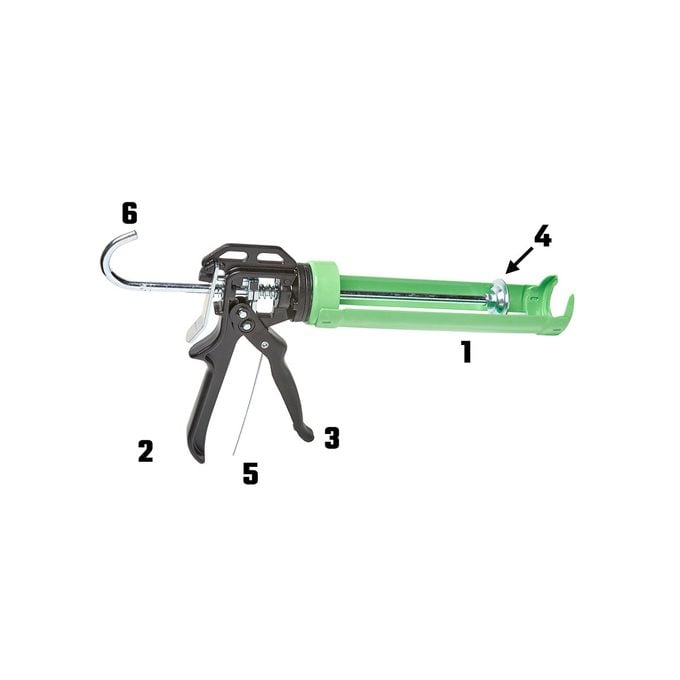
Setting Up The Caulk Gun
Setting up a caulk gun is the first step to a smooth, clean application. Proper setup ensures the caulk flows evenly. This saves time and avoids mess. Follow these simple steps to prepare your tool for use.
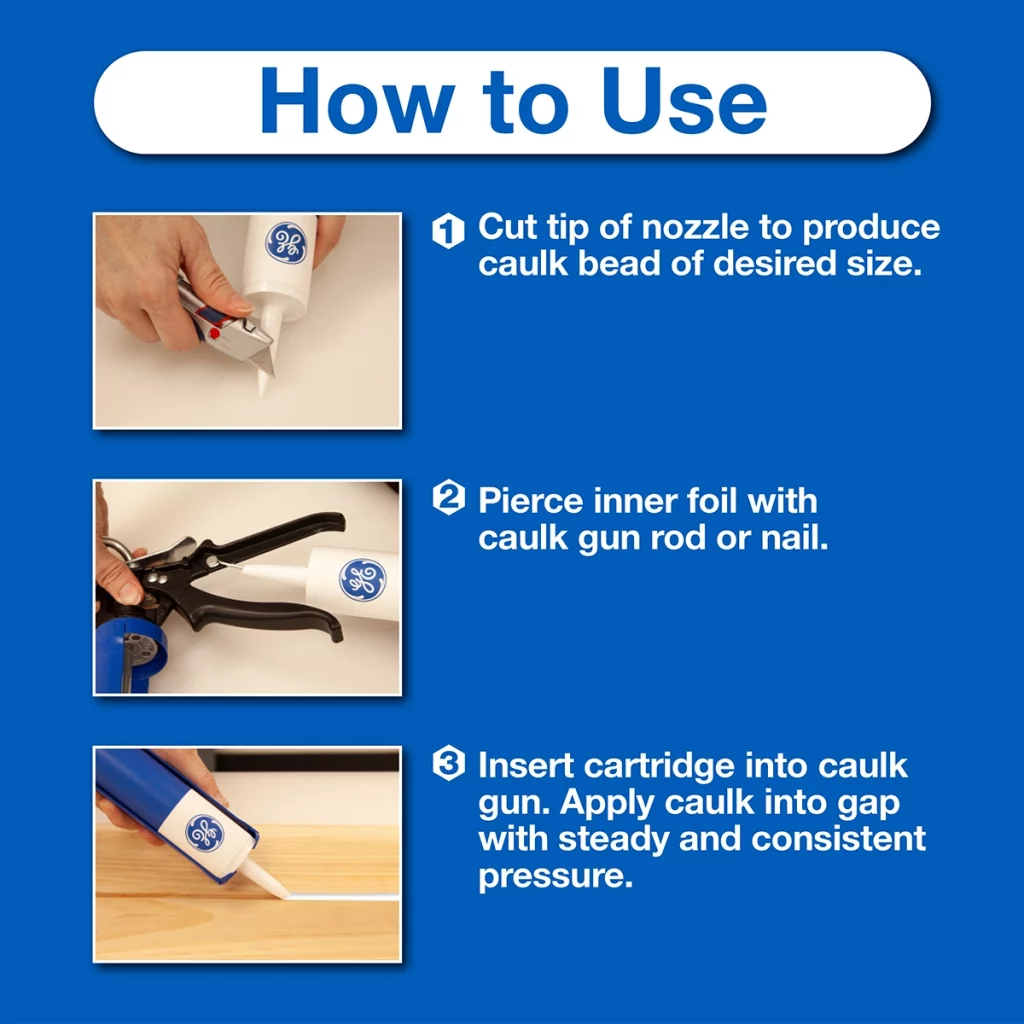
Loading The Cartridge
Pull back the plunger rod on the caulk gun. Insert the cartridge into the frame with the nozzle pointing out. Push the plunger rod forward until it touches the bottom of the cartridge. Make sure the cartridge is secure and won’t move during use.
Cutting The Nozzle
Use a sharp knife or scissors to cut the nozzle tip. Cut at an angle for better control. Start with a small opening to avoid excess caulk. You can always cut more if needed. The size of the cut controls the flow of caulk.
Adjusting The Pressure
Press the trigger slowly to test the flow. If too much caulk comes out, ease your grip. Most caulk guns have a pressure release lever. Use it to stop caulk flow quickly. Adjust pressure to match the task and surface.
Applying Caulk Smoothly
Applying caulk smoothly takes practice and patience. A smooth application makes the job look neat and helps the caulk seal better. The right technique prevents gaps and messy edges. Follow clear steps to get a clean, even line every time.
Proper Angle And Speed
Hold the caulk gun at a 45-degree angle. This angle helps the caulk flow evenly into the gap. Move the gun slowly and steadily. A fast speed causes uneven lines and blobs. Keep a steady hand to control the caulk flow.
Maintaining Consistent Bead
Apply steady pressure on the trigger. This keeps the bead thickness the same. Avoid stopping and starting too often. A continuous bead looks smoother and seals better. Keep your wrist steady as you move along the joint.
Avoiding Common Mistakes
Do not overload the gap with too much caulk. Excess caulk can cause messy cleanup. Avoid pulling the gun away too quickly. This can break the bead. Use a wet finger or tool to smooth the caulk right after applying it.
Finishing And Cleaning
Finishing and cleaning are the final steps after applying caulk. These steps make your work look neat and last longer. Proper finishing shapes the caulk and removes extra material. Cleaning prevents mess and keeps tools ready for next use. Understanding curing times helps avoid damage to the fresh caulk.
Tooling The Caulk Bead
Tooling smooths the caulk bead and presses it into the joint. Use a wet finger or a caulking tool. Move slowly along the bead, keeping steady pressure. This action shapes the caulk and removes air bubbles. Smooth caulk sticks better and looks cleaner.
Cleaning Excess Caulk
Remove extra caulk before it dries. Use a damp cloth or sponge. Wipe carefully to avoid smearing caulk on surfaces. For dried caulk, gently scrape with a plastic tool. Clean tools right after use with warm soapy water.
Curing And Drying Times
Caulk needs time to cure and dry fully. Check the product label for exact times. Avoid touching or painting the caulk during this period. Proper curing ensures strong seals and prevents cracks. Keep the area dry and ventilated to speed drying.

Credit: www.reddit.com
Safety And Maintenance Tips
Safety and maintenance are key when using a caulk gun. Following simple tips protects you and keeps the tool working well. Proper care extends the life of your caulk gun and ensures smooth application every time.
Protective Gear Recommendations
Wear gloves to protect your hands from sticky caulk. Use safety glasses to keep caulk out of your eyes. A mask helps avoid breathing in fumes from some caulks. Dress in old clothes to prevent stains.
Storing Leftover Caulk
Seal the caulk tube tightly after use. Store it in a cool, dry place to prevent it from drying out. Keep tubes upright to avoid leaks. Label tubes with the date to track freshness.
Cleaning The Caulk Gun
Remove leftover caulk from the gun after each use. Use a cloth or paper towel for cleaning. For stubborn caulk, use a small brush or scraper. Regular cleaning prevents clogs and keeps the gun smooth.
Credit: gesealants.com
Frequently Asked Questions
How Do You Load A Caulk Gun Properly?
To load a caulk gun, first cut the nozzle of the tube at a 45-degree angle. Push the tube into the gun, then press the release lever. Pull the plunger back, place it against the tube’s base, and you’re ready to apply caulk.
What Is The Best Technique For Using A Caulk Gun?
Hold the caulk gun at a 45-degree angle to the surface. Squeeze the trigger gently and move the gun steadily. Maintain consistent pressure to create a smooth, even bead without gaps or bubbles for a professional finish.
How Do You Clean A Caulk Gun After Use?
Remove excess caulk from the nozzle with a rag. Use a paper towel or cloth to wipe the gun. For water-based caulk, wash the nozzle with warm, soapy water. For silicone, use mineral spirits or a specific cleaner.
Can I Use Any Caulk Tube With My Caulk Gun?
Most caulk guns fit standard tubes, but check compatibility. Measure the tube diameter and gun frame size to ensure a proper fit. Using the right size prevents leaks and ensures smooth application.
Conclusion
Using a caulk gun is simple with the right steps. Prepare the surface clean and dry before you start. Cut the nozzle at an angle for better control. Squeeze the trigger gently to apply caulk evenly. Smooth the line with a wet finger or tool.
Take your time to avoid messy results. Practice makes the process easier and faster. Now, you can fix cracks and seal gaps yourself. This skill saves money and keeps your home protected. Try it on small projects first to build confidence.