Replacing the subfloor in a bathroom might seem like a big project, but with careful planning and the right steps, it’s something a dedicated homeowner can tackle. Water leaks, mold, or soft spots under your feet are signs that your bathroom subfloor needs attention.
Ignoring these problems can lead to costly repairs and even health risks. This guide will show you how to replace a bathroom subfloor step by step, explain what tools and materials you need, and point out the common mistakes most beginners overlook.
Whether you plan to do it yourself or just want to understand the process before hiring a contractor, you’ll find clear answers here.
Signs Your Bathroom Subfloor Needs Replacement
A strong subfloor is important for any bathroom. But how can you tell when it’s time for a replacement? Look for these warning signs:
- Soft spots: If the floor feels spongy or bouncy, the wood underneath may be rotting.
- Musty odors: Persistent smells often mean mold or mildew is present.
- Visible mold: Black or green patches on the floor or walls can indicate deeper water damage.
- Loose or cracked tiles: Tiles coming up or grout lines cracking can be a symptom of subfloor movement.
- Sagging areas: If the floor dips in places, the subfloor may be weakened.
Catching these signs early can prevent more expensive problems later.
Tools And Materials You’ll Need
Before starting, gather everything so you don’t have to run to the store mid-project. Here’s a checklist of essentials:
- Pry bar
- Circular saw or oscillating multi-tool
- Hammer and nails (or screw gun and screws)
- Measuring tape
- Utility knife
- Safety gear (gloves, eye protection, dust mask)
- Chalk line
- Carpenter’s square
- Construction adhesive
- New subfloor panels (usually 3/4″ tongue-and-groove plywood)
- Level
- Shims (for leveling)
- Wood filler or patching compound
If your bathroom has a lot of moisture issues, consider using moisture-resistant plywood or cement backer board for extra protection.
Step-by-step Guide To Replacing Bathroom Subfloor
Replacing a bathroom subfloor means working in a small space, often with plumbing fixtures in the way. Here’s how to do it safely and correctly.
1. Prepare The Work Area
Start by clearing the bathroom. Remove all items from counters, shelves, and the floor. Ventilate the area if possible—open windows or use a fan. Turn off the water supply to the bathroom. It’s important to keep the space as clean and dry as possible.
2. Remove Fixtures And Flooring
Take out the toilet first. Shut off the water, disconnect the supply line, and unscrew the bolts at the base. Tip the toilet gently to the side and move it out of the room.
Next, remove the vanity, if possible. Loosen the fasteners and disconnect plumbing lines. For the bathtub, you may only need to remove the floor up to the tub’s edge unless the damage extends underneath.
Now, peel up the existing floor covering. For tile, use a hammer and chisel or pry bar. For vinyl, a utility knife can help. Remove all nails, staples, or adhesive residue.
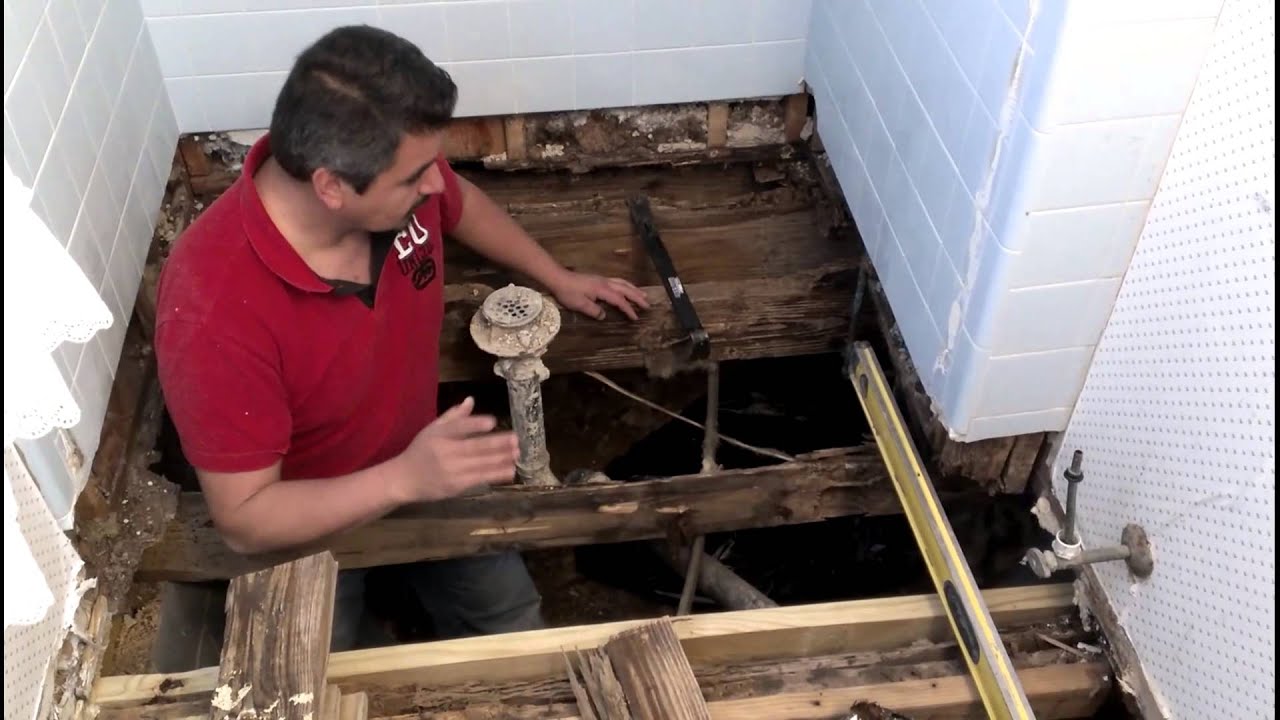
3. Inspect And Mark The Damaged Subfloor
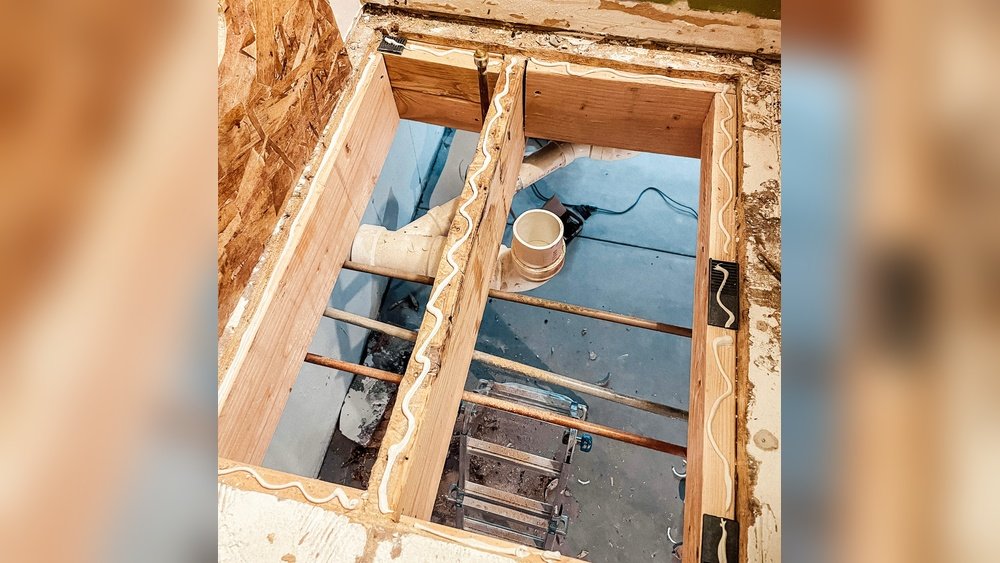
Check for water-damaged or rotten areas. Use a screwdriver to poke the wood—if it sinks in easily, it’s compromised. With a chalk line, mark cut lines along the joists. Always try to cut on top of a joist for a secure edge when installing new panels.
4. Cut And Remove The Old Subfloor
Set your saw blade depth just slightly deeper than the subfloor thickness (usually 3/4 inch). Carefully cut along your lines. Use a pry bar to lift the old panels—work slowly to avoid damaging the floor joists or plumbing below.
Dispose of the old subfloor material safely. Moldy wood can be hazardous; wear a dust mask, and seal pieces in heavy-duty trash bags.
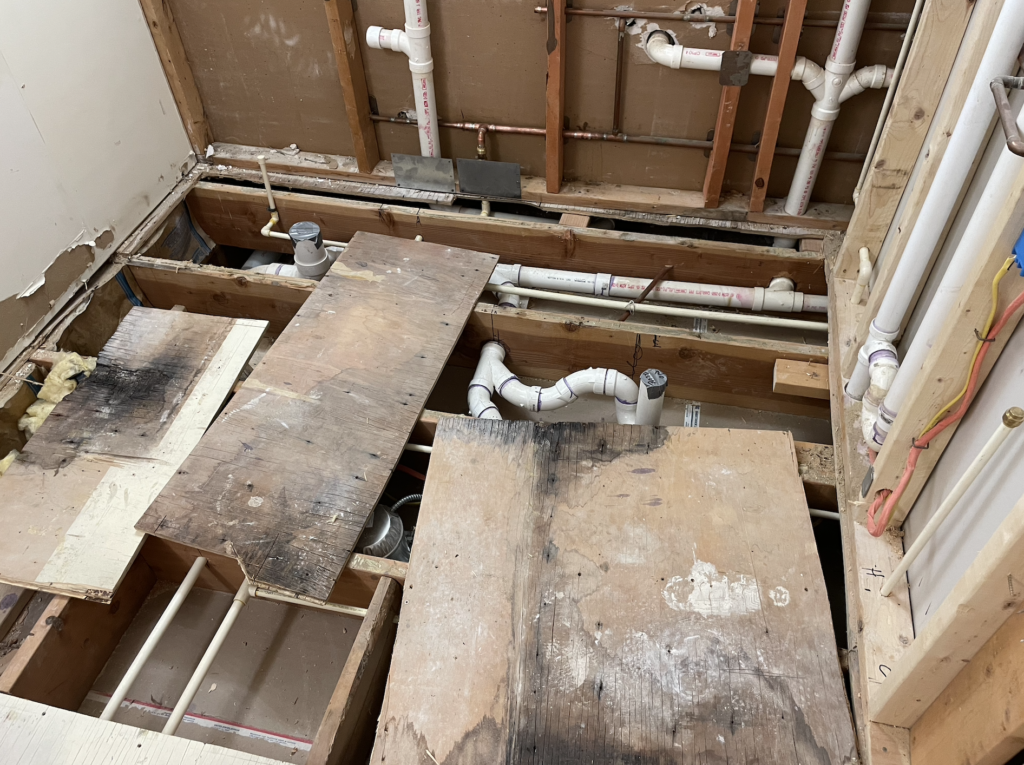
5. Inspect And Repair Floor Joists
With the subfloor up, look at the floor joists for signs of water damage, mold, or rot. If you see minor mold, clean it with a bleach solution and let it dry completely. For soft or damaged areas, you might need to sister a new joist alongside the old one or call a professional for structural work.
Here’s a quick comparison of repair options:
| Problem | DIY Solution | When to Call a Pro |
|---|---|---|
| Minor surface mold | Clean with bleach, let dry | Never |
| Small cracks | Fill with wood filler | If cracks are wider than 1/4 inch |
| Rotten joist | Sister new joist | If more than one joist is affected |
6. Prepare And Cut The New Subfloor
Measure the area twice before cutting your new subfloor panels. A carpenter’s square and chalk line will help you get straight cuts. If your bathroom is not a perfect rectangle, cut panels to fit snugly around corners, pipes, or vents. Leave a 1/8-inch gap between panels for expansion.
7. Install The New Subfloor
Lay the new panels so their edges fall on the centers of the joists. Apply construction adhesive to the top of each joist before setting each piece in place. This reduces squeaks and movement. Screw or nail down the panels every 6-8 inches along the edges and every 12 inches in the field.
Check for level as you go. Use shims under the subfloor if you find low spots. Fill any screw holes or seams with wood filler for a smooth finish.
8. Seal Joints And Edges
For bathrooms, it’s wise to seal all panel joints and the perimeter with a high-quality, waterproof caulk. This step helps protect against future leaks. If you want even more moisture protection, roll on a liquid waterproofing membrane before installing the finished floor.
9. Reinstall Flooring And Fixtures
Once your new subfloor is secure, you can install your finished flooring. For tile, use a cement backer board on top of the subfloor. For vinyl or laminate, follow the manufacturer’s instructions for underlayment. Reinstall the toilet and vanity, reconnecting all plumbing carefully.
Test for leaks before using the bathroom normally.
Here’s a useful installation order:
- Subfloor panels
- Waterproofing (optional but recommended)
- Backer board (for tile)
- Finished flooring
- Fixtures (toilet, vanity)
Common Mistakes To Avoid
Replacing a subfloor is more than just swapping out wood. Here are mistakes many beginners make:
- Not checking for leaks: Fix all plumbing leaks before new wood goes in.
- Skipping waterproofing: Bathrooms are wet; always seal seams and consider a waterproof layer.
- Cutting subfloor panels too tight: Wood expands and contracts. Always leave a small gap between panels.
- Using the wrong materials: Regular plywood absorbs water easily. Use moisture-resistant or exterior-grade plywood.
- Ignoring venting: Moisture from showers can be trapped under floors. Make sure your bathroom has a working exhaust fan.
Credit: www.ourhowtohome.com
Cost Breakdown And Time Estimate
Replacing a bathroom subfloor can be affordable or expensive, depending on the size of your bathroom and the materials you choose. Here’s a simple comparison:
| Item | DIY Cost (USD) | Pro Cost (USD) |
|---|---|---|
| Plywood (4’x8′) | $40–$60 | Included |
| Fasteners & adhesive | $20–$40 | Included |
| Backer board | $35–$70 | Included |
| Labor | Free | $400–$1,000+ |
| Total (5×8 ft bathroom) | $150–$250 | $600–$1,200 |
Time needed: For a small bathroom, plan on 1-2 days if you work steadily and have all tools ready. Add extra time if you find joist damage or need to wait for materials to dry.
Practical Tips For A Lasting Subfloor
Most guides miss these simple tricks, but they make a real difference:
- When reinstalling the toilet, always use a new wax ring. Reusing the old one risks leaks.
- If your bathroom is on the second floor, check the ceiling below for water stains before starting. Hidden leaks can travel.
- Label your plumbing lines and electrical wires with tape before disconnecting anything. This makes reconnection faster and safer.
- Use screws instead of nails for a tighter, longer-lasting fit—this helps prevent floor squeaks.
- Let new subfloor panels acclimate to the bathroom’s humidity for 24 hours before installing. This reduces swelling and warping.

Credit: www.youtube.com
When To Call A Professional
While many homeowners can handle subfloor replacement, there are times when it’s best to call in a pro:
- If you find major joist damage or mold covering large areas
- If the floor feels uneven across the whole room
- If you’re uncomfortable with plumbing or electrical work
- If your home is old and may have hidden asbestos or lead
A professional can often finish the job faster and offer a warranty on their work.
How To Prevent Subfloor Damage In The Future
Prevention is always cheaper than repair. Here’s what you can do:
- Fix leaks right away—small drips add up fast.
- Always use exhaust fans during and after showers.
- Reseal grout lines in tile floors every year.
- Check caulk around tubs and toilets regularly.
- Use bath mats to catch splashes, and avoid letting water sit on the floor.
Staying alert to changes in your bathroom helps catch issues before they become emergencies.
Credit: www.youtube.com
Frequently Asked Questions
How Do I Know If My Bathroom Subfloor Has Water Damage?
If your floor feels soft, bouncy, or sags in places, or if you see mold, musty smells, or cracked tiles, these are common signs of water damage. You might also see water stains on the ceiling below your bathroom.
Can I Replace Just A Section Of Subfloor, Or Do I Need To Do The Whole Room?
You can replace just the damaged section if the rest of the subfloor is solid. Be sure to cut panels so their edges rest on the joists for proper support. If damage is widespread, a full replacement is better.
What’s The Best Material For A Bathroom Subfloor?
Moisture-resistant plywood is a good choice for most bathrooms. For extra protection, especially in very wet areas, consider cement backer board. This resists water better than wood.
How Long Does It Take To Replace A Bathroom Subfloor?
For a small bathroom, expect the project to take 1-2 days for DIY, not counting drying time for any cleaning or repairs. Professional crews can often finish in a single day.
Is It Possible To Replace A Subfloor Without Removing The Bathtub?
Yes, if the subfloor under the tub is not damaged, you can cut the old panels up to the edge of the tub. If you see rot or mold under the tub, it’s best to remove the tub and replace the subfloor underneath.
Replacing a bathroom subfloor takes planning and patience, but doing it right protects your home from future damage. If you’re unsure about any step, don’t hesitate to ask for help or consult guides from reliable sources, such as Family Handyman. With careful work, your bathroom floor can be safe, solid, and ready for years of use.