Have you ever looked up at your ceiling and thought about swapping your old ceiling fan for a sleek new light fixture? You’re not alone.
Many homeowners are opting for this change to enhance the style and ambiance of their rooms. But how do you go about replacing a ceiling fan with a light fixture? The process might seem daunting, but it’s easier than you think.
Imagine transforming your space with a simple swap that could elevate your room’s aesthetic and lighting. Your home deserves an upgrade, and with the right guidance, you can achieve it. We’ll walk you through the steps to make this transformation happen effortlessly and safely. Stick around, and you’ll find out just how easy it can be to bring a fresh glow to your room.
Safety Precautions
Ensure power is off at the circuit breaker before starting. Use a sturdy ladder for safe access. Wear protective goggles and gloves to prevent injuries during installation.
Replacing a ceiling fan with a light fixture might seem like a straightforward task, but safety should be your top priority. Before you dive into the project, it’s crucial to consider the necessary precautions to protect yourself and your home. A simple oversight can lead to electrical hazards or even injury. How do you ensure that your DIY project is both safe and successful? Let’s break down the essential safety measures you need to take.
Turn Off Power
The first step in any electrical project is turning off the power. Locate your home’s circuit breaker and switch off the power to the room where you’ll be working. This step might sound obvious, but many DIY enthusiasts have underestimated its importance, leading to dangerous situations. To verify that the power is truly off, try flipping the fan switch or using a voltage tester on the wires. This will give you peace of mind before handling any electrical components.
Gather Safety Gear
Equipping yourself with the right safety gear can prevent injuries and make the process smoother. Wear rubber-soled shoes to reduce the risk of electrical shock. Use gloves to protect your hands from sharp edges or accidental cuts. Safety goggles are also a smart choice to shield your eyes from any dust or debris. You might feel tempted to skip these steps, but investing in safety gear is a small price to pay for your well-being. Are you aware of how these precautions can make a difference in your project? Taking the time to turn off power and gather safety gear not only safeguards you but also ensures the light fixture is installed correctly. What other safety measures do you think are essential when tackling home improvement projects?
Tools And Materials
Switching a ceiling fan for a light fixture needs certain tools and materials. Gather a screwdriver, wire nuts, and a voltage tester. Make sure you have a new light fixture and compatible bulbs.
Replacing a ceiling fan with a light fixture can transform the look and functionality of a room. Before you dive in, gathering the right tools and materials is crucial for a smooth process. Without the proper equipment, even a simple swap can become frustrating. Imagine standing on a ladder, reaching up, only to realize you’re missing a vital tool. Let’s ensure you’re fully prepared for the task at hand.
Essential Tools
Having the right tools makes all the difference. Start with a screwdriver set. It’s important to have both flathead and Phillips to tackle various screws. A voltage tester is also essential. This ensures you work safely by confirming the power is off. Don’t forget a wire stripper. This tool simplifies cutting and stripping wires, making the job efficient. A drill with appropriate bits will help if you need to install new screws. Lastly, grab a ladder. A sturdy ladder gives you the reach and stability needed to work overhead safely.
Required Materials
The materials you choose can affect both the ease of installation and the final look of the fixture. Start with a new light fixture that suits your room’s style and lighting needs. Make sure it fits the existing electrical box size. You’ll need wire nuts to securely connect wires. These small but crucial components prevent electrical hazards. Consider using a mounting bracket. Some fixtures come with one, but double-check to ensure you have the right size. Lastly, don’t forget light bulbs. Choose bulbs that match the fixture’s specifications and your desired light intensity. By preparing these tools and materials in advance, you set yourself up for a smooth installation. It’s like packing all your essentials for a trip before you leave. What experiences have you had where preparation made all the difference?
Removing The Ceiling Fan
Replacing a ceiling fan with a light fixture starts with removing the fan. This process requires patience and attention to detail. Follow these steps to safely remove the fan.
Unscrew The Fan Blades
First, turn off the power to the fan at the breaker. Use a screwdriver to remove the screws holding the fan blades. Keep the screws in a safe place. Carefully take down each blade and set them aside.
Detach The Fan Motor
After removing the blades, focus on the fan motor. Look for screws securing the motor to the bracket. Unscrew them slowly to prevent dropping the motor. Once loose, gently lower the motor and place it safely on the ground.
Disconnect Electrical Wires
Locate the wires connected to the fan. Use wire cutters to remove any wire nuts. Carefully disconnect each wire from the fan. Make sure to note which wire connects where for later use. Wrap exposed wires with electrical tape for safety.
Preparing The Ceiling
Preparing the ceiling is a crucial step in replacing a ceiling fan with a light fixture. It ensures the new fixture is safe and secure. This part of the process requires attention to detail and proper tools. Follow these steps to make sure your ceiling is ready for the change.
Inspect The Junction Box
First, turn off the power at the circuit breaker. Safety first. Remove the ceiling fan to access the junction box. Check if the box is rated for light fixtures. It must support the weight of the new fixture. Look for a UL rating label inside the box. If the box looks old or damaged, replace it. Use a sturdy metal box for safety.
Secure Mounting Hardware
Ensure that the mounting hardware is secure. The hardware holds the light fixture in place. Use a screwdriver to tighten any loose screws in the junction box. Check that all parts are in good condition. If any parts are worn, replace them. The light fixture should attach firmly to avoid accidents.
Installing The Light Fixture
So, you’ve decided to swap out your ceiling fan for a stylish light fixture. Whether it’s to modernize your space or simply because you never use the fan, installing a light fixture is a rewarding DIY project. It’s a straightforward process, but attention to detail is crucial to ensure safety and functionality. Let’s dive into the installation steps!
Assemble The Fixture
Start by unpacking the light fixture components carefully. Lay them out to get a clear view of what goes where. Follow the manufacturer’s instructions to assemble any parts, such as attaching the shade or bulbs. This is your chance to make sure everything is intact before you get up on that ladder.
Are you feeling a bit overwhelmed? Take a deep breath and remember that each piece has its place. Focus on one part at a time, and soon you’ll see it come together like a puzzle.
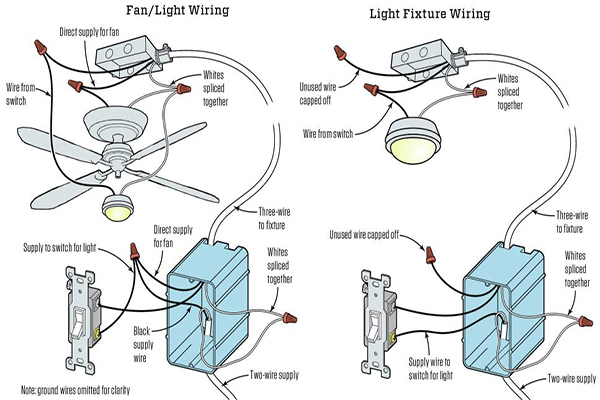
Connect The Wires
Safety first! Turn off the power supply at the circuit breaker before touching any wires. Once you’re sure the power is off, connect the fixture’s wires to the ceiling wires. Typically, you’ll match them by color: black to black, white to white, and green or bare wire to the ground.
Use wire nuts to secure the connections. If you’re unsure, a quick consultation with a wiring diagram can boost your confidence. Double-check each connection, as loose wires can lead to a flickering light or even electrical hazards.
Attach The Fixture To The Ceiling
Now comes the moment of truth—attaching the fixture to the ceiling. Hold the fixture up and align it with the mounting bracket. Secure it using screws provided in the kit, ensuring it’s snug and stable. This step is crucial for preventing any wobble or fall.
Consider asking a friend to help hold the fixture as you screw it in. It not only makes the process faster but also safer. Have you ever tried holding up a fixture for longer than expected? It’s a workout you didn’t sign up for!
Once everything is in place, turn the power back on and admire your handiwork. Does the light illuminate your room just as you imagined? If so, congratulations! You’ve successfully transformed your space with your new light fixture. If not, check the connections again—sometimes a small tweak is all it takes.

Credit: www.ifixit.com
Testing The New Light Fixture
Once your new light fixture is installed, testing it is crucial. This ensures it works properly and safely. Follow these simple steps to verify functionality.
Restore Power
Turn on the circuit breaker. This restores electricity to your fixture. Make sure the switch for the fixture is also turned on. This will allow you to test if the light works.
Check Functionality
With power restored, check if the light turns on. Observe its brightness and consistency. Flickering or dim lighting might indicate a problem. Ensure the bulb is correctly fitted and functional.
If the light does not work, double-check connections. Ensure wires are securely attached. You might need to recheck your installation steps. Proper functionality is key for safety and satisfaction.
Troubleshooting Common Issues
Facing issues with ceiling fan replacement? Ensure power is off before starting. Carefully disconnect wires, then attach new light fixture.
Replacing a ceiling fan with a light fixture can enhance your room’s ambiance. It’s not always smooth sailing. You might face some common issues during installation. Understanding these problems can save you time and frustration. Here are some troubleshooting tips for common issues.
Light Not Turning On
First, check the bulb. Ensure it’s properly screwed in. Verify the bulb is functional. You can test it with another fixture. Examine the wiring connections. Loose wires may prevent the light from working. Confirm the light switch is operational. Try using a different switch. Check the circuit breaker. It might be tripped or off. Reset it if necessary. These steps can help identify the problem.
Flickering Or Dimming
Flickering lights can be annoying. Start by checking the bulb. Ensure it’s the right type for your fixture. LED bulbs may require special dimmers. Verify the dimmer switch compatibility. Inspect the wiring connections. Loose wires can cause flickering. Examine the voltage supply. Low voltage can lead to dimming. Adjust the voltage if needed. If problems persist, consult an electrician. They can provide expert assistance.

Credit: www.reddit.com
Credit: bacononline.amebaownd.com
Frequently Asked Questions
How Do I Remove A Ceiling Fan Safely?
First, turn off the power at the circuit breaker. Next, unscrew the fan blades, then the motor. Finally, disconnect wiring, ensuring no live wires remain.
Can Any Light Fixture Replace A Ceiling Fan?
Not every light fixture can replace a ceiling fan. Choose one compatible with ceiling fan wiring and weight capacity for safe installation.
What Tools Are Needed For This Task?
You’ll need a screwdriver, wire stripper, voltage tester, and ladder. These tools ensure safe and efficient removal and installation.
Are There Electrical Considerations For Switching Fixtures?
Yes, ensure the existing wiring matches your new fixture’s requirements. Check for grounding and voltage compatibility to avoid electrical hazards.
Conclusion
Replacing a ceiling fan with a light fixture is simple. Just follow the steps carefully. Safety comes first; always turn off the power. Gather your tools and new fixture. Remove the old fan, and keep the wires organized. Attach the new fixture securely.
Double-check everything before turning the power back on. Enjoy your new light and the refreshed room ambiance. This DIY project can save you money and time. Plus, it adds a personal touch to your space. With these steps, you’re ready to tackle this task with ease.
So, whatever you land here to know about the detail guide about how to replace a ceiling fan with a light fixture,we tried our best to provide you actual guide.
Happy lighting!