Replacing a bathroom exhaust fan can sound complicated, but it’s actually a doable job for most homeowners. An exhaust fan keeps your bathroom free from mold, mildew, and odors by moving moist air outside. If your fan is noisy, weak, or broken, it’s time for a new one.
With some careful steps and the right tools, you can update your fan and improve your bathroom’s air quality. This guide walks you through everything—from choosing the right fan to safe installation. You’ll also learn some tips that first-timers often miss.
Why Replace A Bathroom Exhaust Fan?
Bathroom fans don’t last forever. Most work well for about 10 years. Over time, dust, moisture, and age cause them to wear out. Here are signs your fan needs replacement:
- It makes loud, rattling noises
- It doesn’t clear steam effectively
- There’s visible mold or mildew in the bathroom
- The fan won’t turn on or off
Replacing a weak fan helps prevent mold growth and keeps your bathroom smelling fresh. It also improves energy efficiency, as newer fans use less electricity.
Choosing The Right Exhaust Fan
Not all bathroom fans are equal. Picking the wrong model can lead to poor performance or noisy operation. Here’s what to look for:
Airflow Rating (cfm)
CFM stands for cubic feet per minute. It measures how much air the fan moves. Most bathrooms need fans rated between 50 and 110 CFM. To choose the right size:
- For bathrooms up to 50 square feet: 50 CFM
- For 50–100 square feet: 80 CFM
- For larger bathrooms: 100–110 CFM
Noise Level (sones)
Fan noise is measured in sones. The lower the sone rating, the quieter the fan. Most people prefer a rating of 1.5 sones or less.
Extra Features
Some fans include lights, heaters, or humidity sensors. Decide if you want these extras before buying.
Energy Efficiency
Look for fans with an ENERGY STAR label. They use less power and are better for the environment.
Comparison Of Popular Exhaust Fans
Here’s a simple comparison of three typical exhaust fans:
| Model | CFM | Sones | Special Features | Price (USD) |
|---|---|---|---|---|
| Basic Fan | 50 | 2.0 | None | 40 |
| Quiet Fan | 80 | 1.1 | Light, Humidity Sensor | 110 |
| Premium Fan | 110 | 0.7 | Heater, Light | 180 |
Tools And Materials Needed
Before you start, gather these tools and supplies:
- New exhaust fan (matching your bathroom size)
- Screwdriver (Phillips and flathead)
- Wire stripper/cutter
- Utility knife
- Measuring tape
- Drill (optional)
- Duct tape
- Ladder or step stool
- Safety glasses and mask
- Electrical tester
You may also need:
- Drywall saw (for enlarging the hole)
- Replacement duct or connectors (if needed)
- New grille or cover
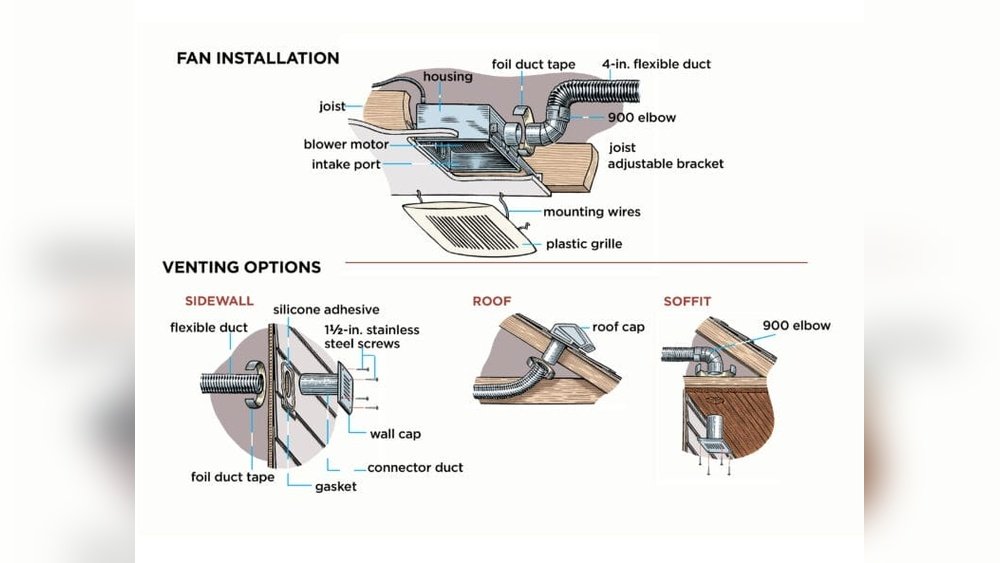
Step-by-step Guide To Replacing The Fan
Follow these steps to remove your old fan and install the new one safely.
1. Turn Off The Power
Safety comes first. Go to your circuit breaker and turn off the power to the bathroom. Use an electrical tester to confirm the fan is off.
2. Remove The Old Fan Cover
Stand on a secure ladder. Locate the fan cover—usually a plastic grille. Pull it down gently. Most covers have metal clips; squeeze them to release the cover.
3. Disconnect The Old Fan
Remove screws holding the fan housing to the ceiling. Carefully pull down the fan. You’ll see wires connected to the unit. Note their color and placement. Use a screwdriver to loosen the wire nuts, then disconnect the wires.
Unhook the exhaust duct (usually a flexible or rigid pipe) from the fan housing. If the fan is connected to a mounting bracket, remove any additional screws.
4. Remove The Fan Housing
Some fans are installed directly in the ceiling drywall, others are attached to joists. If yours is attached to a joist, unscrew the mounting bracket. If the housing is larger than the hole, use a utility knife or drywall saw to carefully enlarge the opening.
5. Prepare For The New Fan
Check the size of your new fan’s housing. If it is larger, trim the ceiling hole. If it is smaller, use a filler piece of drywall for a snug fit.
Inspect the duct connection and wiring. Replace old ductwork if it’s damaged. Clean out dust or debris.
6. Connect The Wiring
Match the wires from your new fan to the existing wires:
- Black wire: Fan power
- White wire: Neutral
- Green or bare wire: Ground
Twist the wires together and secure them with wire nuts. If your fan has extra wires (for light or heater), connect those as shown in the instructions.
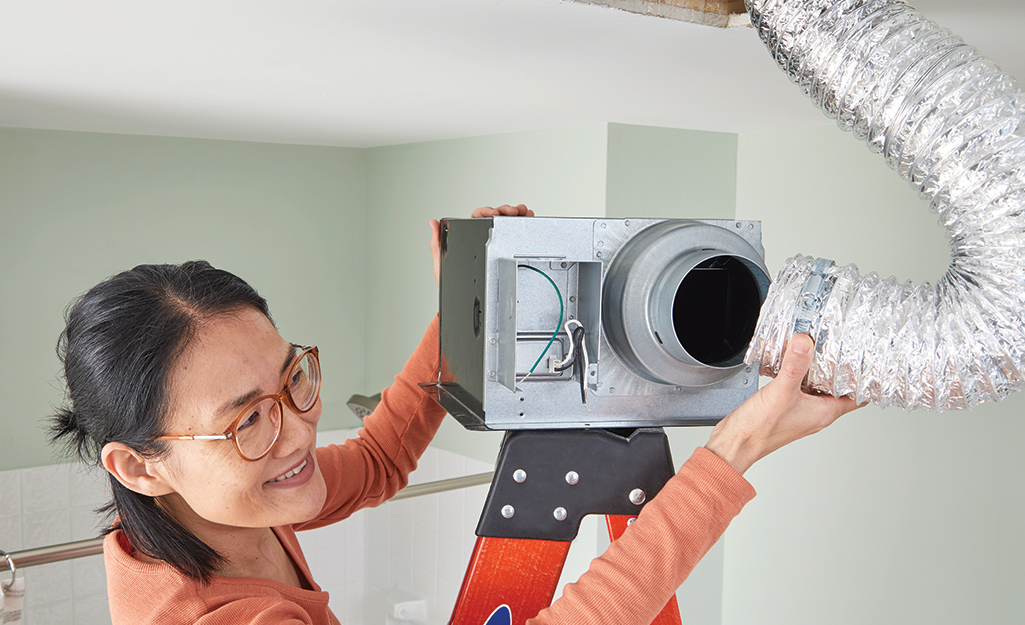
7. Attach The Exhaust Duct
Slide the duct over the fan’s exhaust port. Secure it with duct tape. Make sure there are no gaps. Poor connections lead to leaks and reduced performance.
8. Mount The New Fan Housing
Insert the new housing into the ceiling. Fasten it to the joist or bracket with screws. Make sure the housing sits flush with the ceiling.
9. Install The Fan Cover
Clip or snap the cover onto the housing. Some covers need screws; others just push into place.
10. Restore Power And Test
Turn the circuit breaker back on. Test the fan to make sure it runs smoothly and quietly. If you have a fan with a light or heater, test those features as well.
Credit: www.homedepot.com
Practical Tips For First-time Installers
Many beginners overlook these small but important steps:
- Check the attic above the bathroom. Make sure the duct leads outside and isn’t blocked.
- Use insulated ducting for colder climates to prevent condensation.
- If your bathroom doesn’t have an existing fan, plan for extra work: Cutting a hole, running new wires, and installing a duct.
Common Mistakes To Avoid
- Choosing the wrong fan size: Too small won’t clear the air, too large wastes energy.
- Loose duct connection: Leaks reduce airflow and cause moisture problems.
- Skipping ground wire: This is a safety risk.
- Not sealing gaps: Air leaks into the attic, leading to mold or water damage.
- Ignoring local building codes: Some areas require specific types of fans or ducting.
Bathroom Exhaust Fan Installation Costs
Replacing a bathroom exhaust fan yourself saves money. Hiring a professional costs more but is sometimes necessary for complex jobs.
Here’s a simple cost comparison:
| Installation Method | Average Cost (USD) | Required Skill Level | Time Needed |
|---|---|---|---|
| DIY | 50–250 | Intermediate | 2–3 hours |
| Professional | 200–600 | None | 1–2 hours |

Credit: www.youtube.com
Ensuring Proper Ventilation
A new fan is only effective if your bathroom is properly vented. The duct must run to the outside of your house—not just into the attic. Poor ventilation can cause moisture problems, even with a new fan.
Checking Ventilation Effectiveness
After installation, run the fan for 15–20 minutes after each shower. Watch for foggy mirrors or lingering odors. If the bathroom stays damp, check the fan’s airflow and duct for blockages.
Maintenance After Replacement
Keep your new fan working well by cleaning it every six months. Dust and moisture build up quickly. Here’s a simple routine:
- Turn off the power
- Remove the cover
- Vacuum dust from the blades and housing
- Wipe surfaces with a damp cloth
- Check duct and wiring for damage
Regular cleaning prevents noise, improves airflow, and extends the life of your fan.
Data: Bathroom Fan Efficiency
Modern fans are much more efficient than older models. Here’s a look at how efficiency has improved:
| Year | Average CFM | Average Sones | Energy Use (Watts) |
|---|---|---|---|
| 2000 | 60 | 2.5 | 40 |
| 2010 | 80 | 1.8 | 30 |
| 2023 | 100 | 1.0 | 18 |
When To Call A Professional
Some situations need expert help:
- You find asbestos or other hazardous materials
- Wiring is old, damaged, or confusing
- The job requires cutting through thick materials or rerouting ducts
- Local codes require licensed installers
A professional can handle these safely and ensure the fan meets building codes.
:max_bytes(150000):strip_icc()/how-to-install-a-bathroom-exhaust-fan-4147975-hero-2d6143520dfc425ba6b0142bf78f0549.jpg)
Credit: www.thespruce.com
Extra Resources
If you want more details or need code information, check out US Department of Energy for official guidance.
Frequently Asked Questions
How Do I Know What Size Fan I Need?
Measure your bathroom’s square footage. For each 1 square foot, you need roughly 1 CFM. For a 60 sq. Ft. bathroom, choose a fan with at least 60 CFM.
Can I Use The Old Duct With A New Fan?
Often yes, if it’s undamaged and fits the new fan. If the duct is torn, crushed, or dirty, replace it for best airflow.
Is It Safe To Install The Fan Myself?
If you follow instructions and turn off power, yes. But, if you’re unsure about wiring or local codes, get professional help.
Why Is My New Fan Noisy?
Noise can come from loose mounting, wrong fan size, or dirt in the blades. Check installation and clean the fan regularly.
Can I Install A Fan Without Attic Access?
Yes, but it’s harder. Some fans are designed for “no attic” installation. You may need special tools and brackets.
Replacing a bathroom exhaust fan is a project that can improve your home’s comfort and air quality. With careful planning and safe steps, most homeowners can do it themselves. Remember to check ducting, use the right size fan, and clean regularly.
If the job feels too complex, there’s no shame in asking a professional for help. The effort you put in pays off with a fresher, healthier bathroom for years to come.