Bringing cool air into your home during hot months is important for comfort and sleep. Many people choose a window air conditioner (AC) for this job. But what if your landlord says “no drilling,” you live in a rental, or you just don’t want to damage your window frame? The good news: there are safe, effective ways to install a window AC unit without drilling any holes. With the right tools, patience, and knowledge, you can enjoy cool air and keep your window and walls untouched.
This guide will walk you through every step to install a window AC without drilling. You’ll learn what equipment you need, how to prepare, and the safest methods to keep your unit stable. Along the way, you’ll discover tips that even experienced DIYers sometimes miss.
Whether you’re a first-timer or just want a cleaner installation, you’ll finish this article ready for a stress-free, drill-free setup.
Why Install A Window Ac Without Drilling?
Many renters and homeowners face restrictions or want to avoid permanent changes. Landlords often forbid holes in window frames, especially in apartments. Older homes may have delicate woodwork that you don’t want to damage. Some people also worry about resale value or simply like the idea of removing the AC easily.
No-drill installation keeps your space flexible. When you move, you can take your AC with you and leave no trace. You also avoid weakening window frames or creating gaps that let in bugs and water. For those who care about aesthetics, a no-hole setup looks cleaner and preserves the original window design.
Can Every Window Ac Be Installed Without Drilling?
Not every window AC is suitable for a no-drill method, but most modern compact units and many mid-size models can work. The key is weight and design. Lightweight units (under 60 lbs) are ideal, while larger units may need extra support.
Before you begin, check:
- The unit’s weight (find this in the manual or online)
- The window type (sliding, double-hung, casement, etc.)
- The width of your window compared to the unit
- The shape of the window sill and frame
If your AC is very heavy or your window is unusually shaped, consult the manufacturer or consider a portable AC as another no-drill option.
Essential Equipment And Tools
You don’t need a workshop full of tools to install a window AC without drilling. However, using the right support brackets, sealing materials, and stabilizers is critical for safety and performance.
Here’s what you’ll need for most installations:
- No-drill window AC support bracket (adjustable, with rubber feet)
- Weatherstripping foam (to seal gaps)
- AC side panels (often included with the unit)
- Measuring tape
- Level (bubble or digital)
- Scissors or utility knife
- Adhesive tape (heavy-duty, weatherproof)
- Extension cord (if the AC’s cord is short; use only heavy-duty, grounded cords)
- Anti-vibration pads (optional, for noise control)
- Safety gloves (to protect hands)
Some brackets are designed for no-drill use and clamp onto the window sill using pressure or adjustable feet. Always read the instructions for your specific bracket.
Step-by-step Installation Guide
Let’s walk through the full process so you can install your window AC unit safely, securely, and without a single hole.
1. Measure Your Window And Ac Unit
Start by measuring the window opening and the AC unit. You need to know:
- Width and height of the window sash
- Depth of the window sill
- Width of the AC unit (including side panels)
Write these numbers down. Your AC must fit in the opening with enough room for the side panels and bracket.
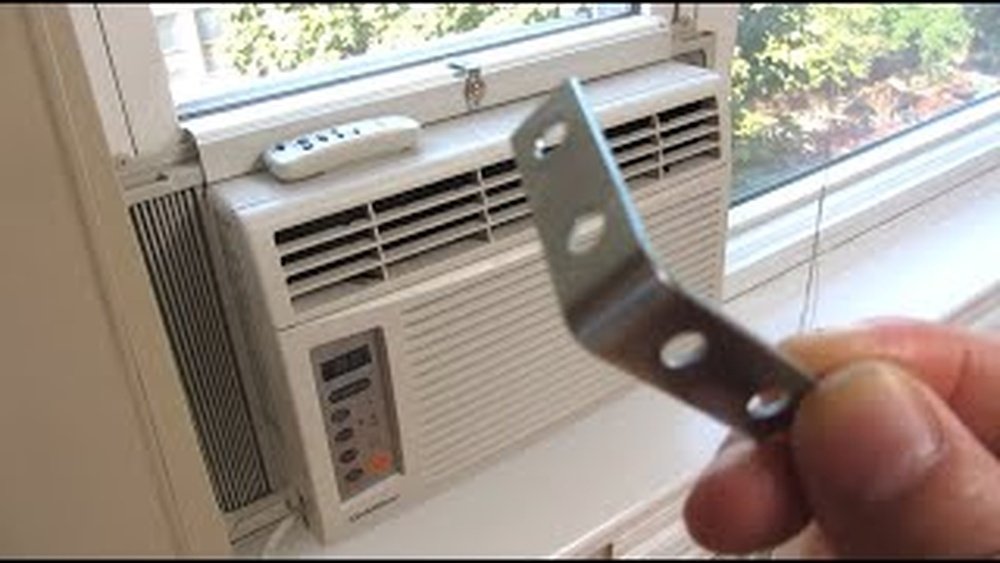
2. Choose The Right No-drill Support Bracket
A support bracket is the most important part of a no-drill installation. It carries most of the unit’s weight and prevents it from tipping outward.
Here is a quick comparison of common bracket types for no-drill installations:
| Bracket Type | Max Weight | Installation Method | Best For |
|---|---|---|---|
| Clamp-On Bracket | 80 lbs | Clamps to window sill, no drilling | Standard double-hung windows |
| Pressure-Fit Bracket | 60 lbs | Expands to fit between window and sill, no screws | Wide sills, rental units |
| Adjustable Foot Bracket | 100 lbs | Rubber feet rest on exterior wall, adjustable arms | Heavy units, thick sills |
Most people find clamp-on brackets easiest. These use strong grips and rubber pads to avoid scratches. Always choose a bracket rated for at least the weight of your AC.
3. Prepare The Window
Clean the window sill and frame. Remove dust, dirt, and old caulking. A clean surface is important for a good seal and strong grip.
Open the window fully. If your window has security locks, remove them temporarily.
Check that the window moves smoothly and can close over the AC unit.
4. Install The Support Bracket
Follow the instructions for your bracket. Most no-drill brackets work like this:
- Place the bracket on the outside window sill.
- Adjust the length to fit the width of the sill.
- Tighten the clamps or feet until the bracket is stable. Do not overtighten—just enough to prevent movement.
- Use a level to ensure the bracket is horizontal. An unlevel bracket can cause water leaks or poor cooling.
Tip: If your sill is sloped, use rubber shims or extra foam pads to keep the bracket level.
5. Position The Ac Unit
With help (if possible), lift the AC onto the bracket. The back of the AC should rest firmly on the support arm, and the bottom edge should be inside the window opening.
Slide the unit until the window sash can close against the top of the AC.
Caution: Window AC units are heavy and awkward. Always lift with your knees, and never lean out the window.
6. Extend And Secure Side Panels
Most AC units include accordion-style side panels. Extend these panels until they fill the gaps on either side of the unit.
Secure the panels using the tracks provided. If your model uses adhesive or foam strips, press them firmly against the window frame.
Use weatherproof tape to seal any remaining small gaps. This keeps out hot air, insects, and rain.
7. Seal The Window And Ac
Use weatherstripping foam to fill gaps along the top and sides of the unit. Thick foam strips work best.
Seal the area where the window sash meets the top of the AC. This is a common spot for leaks and rattling.
For extra insulation, you can add a removable acrylic or plastic panel over the side panels.
8. Plug In And Test
Connect the AC unit to a grounded outlet. If you need an extension cord, make sure it’s rated for high power (minimum 14-gauge).
Turn on the unit and check for:
- Cool air flow
- No vibration or rattling
- No gaps around the unit
- Smooth window operation
If you notice drafts, add more foam or tape. If the unit moves, double-check the bracket.
9. Secure The Window (safety Step)
To prevent the window from opening unexpectedly, place a window lock or strong dowel in the track above the sash. This adds security and stops the AC from shifting.
10. Clean Up And Monitor
Wipe down the area, check the seal, and enjoy your cool room.
After a week, re-check the bracket and seals. Tighten or adjust as needed.

Credit: www.youtube.com
Key Tips For A Safe, Effective No-drill Installation
- Always use a support bracket—never rely just on the window frame or sash for weight.
- Seal all gaps to prevent air leaks and bugs.
- Do not block the AC’s drainage holes—these allow water to escape.
- Check local building codes or rental agreements before starting.
- For tall or heavy units, consider a second safety strap (adhesive or removable) for extra peace of mind.
Common Mistakes And How To Avoid Them
Even careful DIYers can make errors with window AC units. Here are some pitfalls and how to avoid them:
- Skipping the bracket: Some people try to wedge the AC in the window with just the sash. This is unsafe and can damage the window.
- Bad measurements: An AC that’s too wide or too deep for the window will never fit securely.
- Poor sealing: Gaps let in hot air, rain, and insects. Use plenty of foam and check for leaks.
- Using weak extension cords: ACs use a lot of power. Thin cords can overheat and cause fires.
- Not leveling the unit: If the AC tilts inward, water can leak into your room.
- Blocking the drainage: Don’t cover the small holes on the back or bottom of the AC. This can cause water to build up and damage your unit.
- Ignoring weight limits: Never use a bracket or window that isn’t rated for your AC’s weight.
Special Advice For Different Window Types
Not all windows are the same. Here’s how to handle common types:
Double-hung Windows
These are the easiest for no-drill installs. The bottom sash slides up, so you can close it on top of the AC unit. Use the included side panels and a clamp-on bracket for best results.
Sliding Windows
Horizontal sliders need a vertical installation. You may need a special vertical support bracket and a foam panel to fill the remaining open space.
Casement Windows
Casement (crank) windows are the hardest for window AC units. Few standard window ACs fit these. If you must use a window AC, look for vertical AC units made for casements, or use a portable AC with a vent kit.
Old Or Fragile Windows
For older wooden windows, choose a bracket with soft rubber pads and avoid overtightening. Add extra foam to protect paint and glass.
Extra Stability: When And How To Add It
If your AC is large or you live in a windy area, extra stability is wise. Here are two ways:
- Removable adhesive straps: These stick to the frame but peel off later. Use only strong, weather-resistant brands.
- Telescoping poles: Some people use an adjustable pole under the outside edge for extra vertical support. This works for ground-floor installs.
Never use rope or wire that could fray or look unsightly from outside.
Pros And Cons Of No-drill Installation
To help you decide if a no-drill setup is right for you, here’s a side-by-side comparison.
| Pros | Cons |
|---|---|
| No permanent damage to window or frame | Some brackets may cost extra |
| Easy removal and reinstallation | May not support very heavy units |
| Good for renters or frequent movers | Requires precise measurement and care |
| Looks cleaner, preserves home value | Less secure if not installed properly |
Energy Efficiency And Comfort Tips
A well-installed AC keeps you cool and saves money. Here’s how to get the most from your unit:
- Seal all air leaks so the AC doesn’t work harder than needed.
- Close curtains or blinds during the hottest part of the day.
- Clean or replace filters every month. Dirty filters reduce cooling power.
- Set the thermostat to a comfortable but not extreme temperature (around 24°C or 75°F).
- Use a fan to circulate cold air, so the AC can run less often.
- Turn off the AC when you’re away for long periods.
Data from the U.S. Department of Energy shows that sealing leaks and maintaining your AC can cut cooling costs by up to 20%.

Credit: www.reddit.com
Maintenance And Removal
When summer ends, you may want to remove your AC. Here’s how to do it safely, without damage:
- Turn off and unplug the AC.
- Remove the window lock or dowel.
- Carefully slide the window sash up.
- With help, lift the AC off the bracket and place it on a sturdy surface.
- Remove side panels and foam strips.
- Take out the bracket, clean the sill, and close the window.
Store your AC in a dry place. Clean the filter and coils before packing it away.
Pro Tip: Save your foam strips and side panels for next year—they can usually be reused.
Non-obvious Insights For Beginners
Many guides skip these details, but they can make your installation easier:
- Test the bracket fit before lifting the AC. Place the bracket, check the level, and make sure the window closes fully with nothing in the way. This prevents last-minute surprises.
- Label your side panels and foam strips with masking tape. When you remove the AC, you’ll know exactly where each piece goes for the next install.
- Buy extra weatherstripping foam. The included strips with many ACs are often too thin or short. Good foam makes a big difference in comfort and energy savings.
- Use anti-vibration pads under the AC if you have wood floors or sensitive neighbors. This cuts noise, especially in older buildings.
Environmental And Safety Considerations
Installing your AC properly does more than cool your room. It also:
- Reduces energy waste, which helps the environment.
- Prevents mold and water damage by stopping leaks.
- Avoids accidents from falling or unstable units.
If you live on a higher floor, always use a bracket rated for your AC’s weight. Some cities have rules about window AC safety—check your local laws.
If you want more technical details or installation videos, the U.S. Department of Energy offers excellent resources at Energy Saver.
Frequently Asked Questions
How Can I Tell If My Window Ac Is Too Heavy For A No-drill Bracket?
Check the weight rating on the bracket packaging or manual. Most no-drill brackets safely support up to 100 lbs. If your AC is heavier, look for a reinforced or multi-bracket system.
What If My Window Is Wider Than The Ac Unit?
Use the included side panels to fill the gap. If they’re too short, cut custom panels from insulated foam board or acrylic, and seal the edges with weatherproof tape.
Can I Install A Window Ac In A Vinyl Window Without Drilling?
Yes. Use a clamp-on or pressure-fit bracket that avoids screws. Add soft foam strips between the bracket and vinyl frame to avoid scratches.
Is It Safe To Use An Extension Cord With A Window Ac?
Only use a heavy-duty, grounded extension cord (14-gauge or thicker). Never use thin or multi-outlet cords, as these can overheat and cause fires.
Will A No-drill Installation Affect My Ac’s Warranty?
No, as long as you follow the manufacturer’s instructions and don’t damage the unit. Avoid blocking vents or drainage holes, and keep the AC stable.
A no-drill window AC installation is the best way to stay cool without compromising your home, rental, or peace of mind. With the right tools and careful setup, you can enjoy cold air all summer—no holes, no hassle, no regrets.
Credit: www.coolwind.com.au