Installing a wall anchor with a drill is a practical skill that can save you time, money, and frustration. Whether you want to hang shelves, mount a TV, or put up artwork, wall anchors help support heavy objects on walls made of drywall, plaster, or masonry.
If you’ve ever had a screw pull out of the wall, you know how important a secure anchor is. Many beginners worry about damaging their walls or making mistakes, but with the right tools and method, anyone can achieve a strong, reliable hold.
This guide covers everything you need to know—from choosing the right anchor to step-by-step installation—so your wall anchors go in safely and stay tight.
Understanding Wall Anchors
Wall anchors are small devices that create a secure point in your wall for screws. They are used when a screw alone would not hold well, especially in drywall, plaster, or hollow walls. There are several types of wall anchors, and knowing which to use can make your installation easier and safer.
Common Types Of Wall Anchors
1. Plastic Expansion Anchors
These are simple and cheap. They expand when you drive a screw into them. Best for light loads and drywall.
2. Toggle Bolts
Made for heavy items, toggle bolts have wings that open behind the wall, spreading the load.
3. Molly Bolts
These are metal anchors that expand behind the wall as you tighten the screw. Good for medium to heavy loads.
4. Threaded Drywall Anchors
Also called “self-drilling anchors,” these twist directly into drywall without a pre-drilled hole. They are quick and strong for small to medium items.
5. Concrete Or Masonry Anchors
For brick or concrete walls, these anchors grip hard surfaces. You will need a masonry drill bit.
Each anchor is designed for a specific wall material and weight range. Always check the package for maximum load capacity.
Choosing The Right Anchor
Picking the correct wall anchor is essential. If you use a weak anchor for a heavy item, it can pull out and damage your wall. Here’s how to choose wisely:
| Wall Material | Recommended Anchor | Weight Capacity |
|---|---|---|
| Drywall | Plastic, Threaded, Molly Bolt | 10-50 lbs |
| Plaster | Toggle Bolt, Molly Bolt | 20-100 lbs |
| Concrete/Brick | Masonry Anchor | 50-200 lbs |
| Hollow Wall | Toggle Bolt | 20-100 lbs |
Tip: Overestimating anchor strength is a common mistake. Always check the combined weight of your item and add 20% for safety.

Credit: www.youtube.com
Tools And Materials You Need
Before you start, gather these tools:
- Drill (corded or cordless)
- Drill bits (match size to anchor; masonry bit for concrete)
- Wall anchor (type depends on wall and item)
- Screwdriver (manual or powered)
- Screws (size matches anchor)
- Hammer (for some anchor types)
- Level (optional, for straight placement)
- Tape measure
- Pencil (for marking)
Having the right tools makes the job smoother and prevents mistakes like oversized holes or crooked anchors.
Preparing Your Wall
Preparation is key for a clean installation. Here’s what to do:
- Find the right spot. Use a tape measure and level to mark where you want your anchor.
- Check for studs. If your item is heavy and there’s a wood stud, use a screw directly into the stud. Anchors are for hollow or weak walls.
- Mark the drill point. Use a pencil to make a clear mark. Double-check the position to avoid mistakes.
Many beginners miss the importance of checking for wires or pipes behind the wall. Use a stud finder with wire detection if possible. Drilling into a hidden wire can be dangerous and costly.
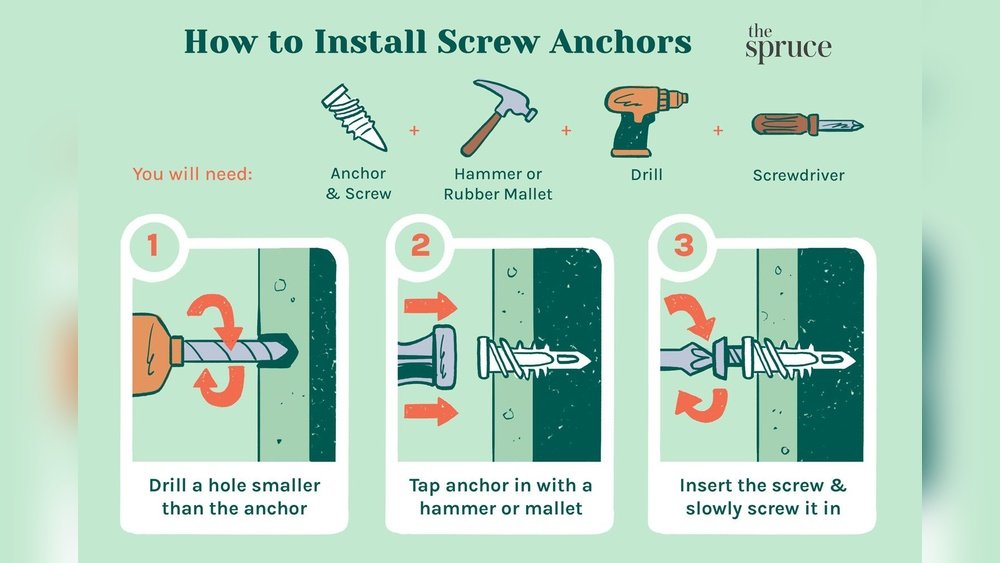
Step-by-step Guide: Installing A Wall Anchor With A Drill
Follow these steps for a secure installation. The process is similar for most wall anchors, but always check the instructions on your anchor package.
1. Mark The Spot
Use a pencil to mark the exact place for your anchor. If you’re hanging multiple items, use a level to ensure they line up.
2. Select The Drill Bit
Choose a drill bit that matches the size of your anchor.
- For plastic anchors: The hole should be slightly smaller than the anchor.
- For toggle bolts: The hole must be large enough for the folded wings.
- For masonry anchors: Use a masonry bit.
Example: If your anchor needs a 3/8-inch hole, use a 3/8-inch bit.
3. Drill The Hole
Set your drill to low speed and drill straight into the wall at your marked spot.
- Hold the drill steady and do not force it.
- Stop when you reach the required depth—usually the length of the anchor.
Tip: Beginners often drill too deep or at an angle. This can weaken the anchor’s grip.
4. Clean The Hole
Remove dust and debris from the hole. Use a vacuum, brush, or tap the wall gently. Dirt can stop the anchor from expanding properly.
5. Insert The Anchor
Push the anchor into the hole.
- For plastic anchors: Tap gently with a hammer if needed.
- For threaded anchors: Screw in with a screwdriver.
- For toggle bolts: Fold the wings, insert, and let them open behind the wall.
If the anchor is loose, the hole may be too big. Try a larger anchor or patch the hole.
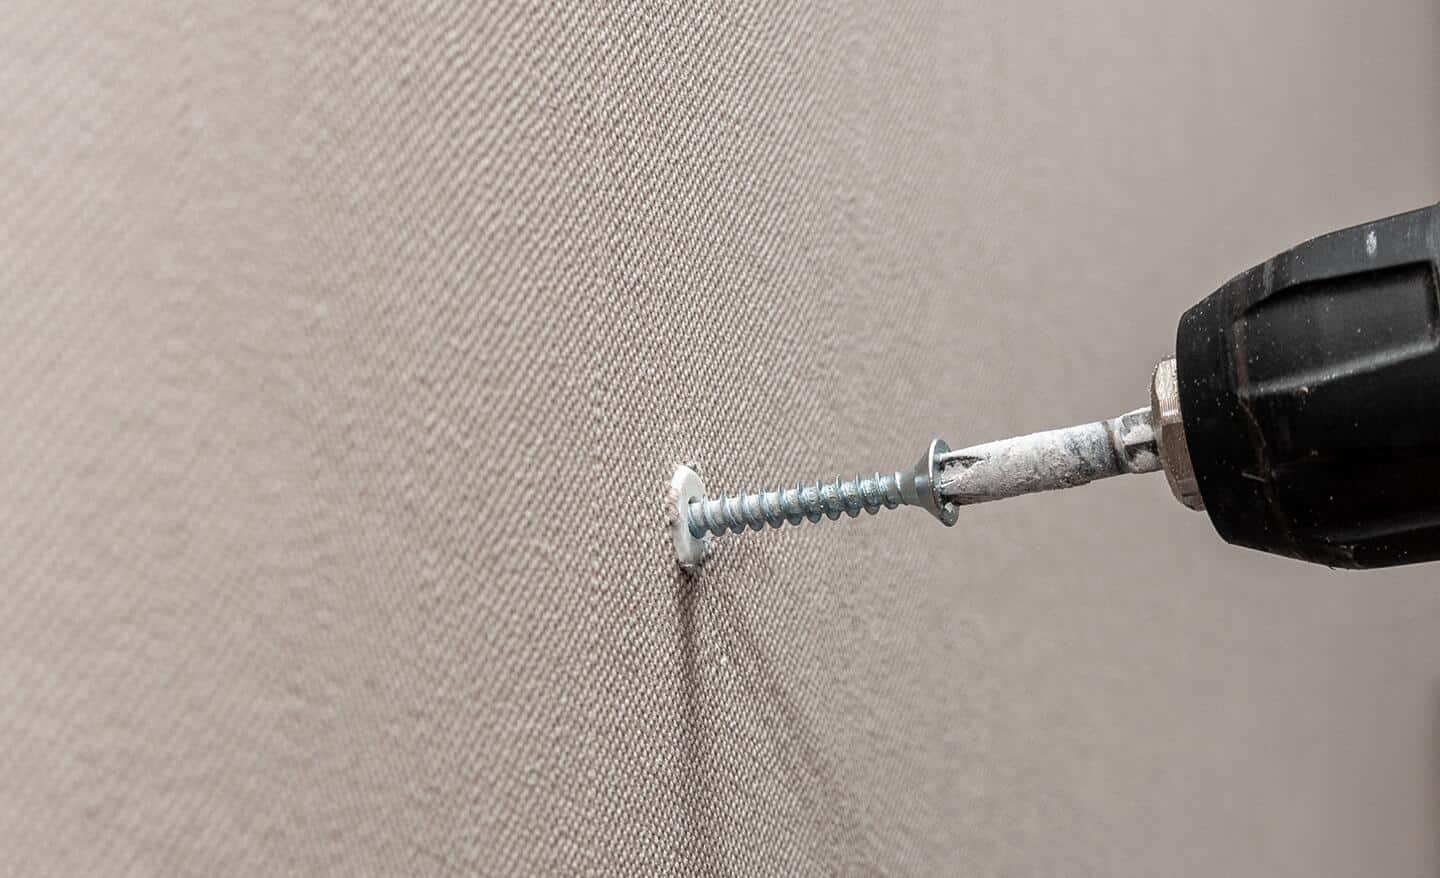
6. Install The Screw
Place your screw into the anchor and tighten with a screwdriver.
- For toggle bolts and molly bolts, tighten until the anchor grips the wall.
- For plastic and threaded anchors, stop when the screw is snug.
Do not overtighten. This can strip the anchor or crack the wall.
7. Check Stability
Gently pull on the installed item. If the anchor moves or feels loose, remove and repeat with a larger anchor.
Common Mistakes And How To Avoid Them
Many beginners make small mistakes that can lead to big problems. Here are some pitfalls to watch for:
1. Using The Wrong Anchor Type.
Not all anchors fit all walls. Choose the right anchor for your wall material.
2. Drilling Too Large A Hole.
Oversized holes mean weak anchors. Use the correct drill bit size.
3. Skipping Wall Checks.
Not checking for studs, wires, or pipes can cause damage or injury.
4. Not Cleaning The Hole.
Dust stops expansion. Always clean out the hole.
5. Overtightening Screws.
Too much force can break the anchor or wall.
6. Ignoring Weight Limits.
Exceeding anchor capacity leads to failure.
:strip_icc()/bhg-how-to-use-drywall-anchors-hero-22675_5033MPD54YABmkWSreJLpC-984f89e4134148038159e64b62c5b31c.jpg)
Credit: www.bhg.com
Practical Tips For Strong Anchors
You can make your installation even better with these tips:
- Use a level for alignment, especially for shelves and frames.
- Anchor spacing: For heavy items, use multiple anchors spaced evenly.
- Wall patching: If you make a mistake, fill the hole with wall filler, let it dry, and try again.
- Check anchor packaging: Manufacturers often list recommended drill bit sizes.
- Test anchors before hanging valuable items.
Here’s a comparison of popular anchor types and their best uses:
| Anchor Type | Best For | Easy to Install? | Re-usable? |
|---|---|---|---|
| Plastic Expansion | Light fixtures | Yes | No |
| Toggle Bolt | Heavy shelves, TVs | Medium | No |
| Molly Bolt | Medium loads | Medium | Yes |
| Threaded Anchor | Pictures, small shelves | Easy | No |
| Masonry Anchor | Concrete, brick | Medium | No |
Safety Considerations
Drilling into walls can be risky if you don’t check for hidden hazards. Here’s what to keep in mind:
- Electric wires: Use a wire detector or stud finder with wire sensing.
- Pipes: Water pipes are often behind kitchen and bathroom walls.
- Wear eye protection: Dust and debris can cause injury.
- Keep the drill steady: A slipping drill can cause crooked holes.
Non-obvious insight: Sometimes, wall anchors can fail because of wall weakness, not anchor quality. If your drywall is crumbling, patch the area before installing anchors.
Credit: www.homedepot.com
Advanced Techniques For Difficult Walls
If you have old plaster, tile, or thick masonry, installation can be tricky.
- Plaster walls: Drill slowly and use anchors made for plaster.
- Tile walls: Use a carbide-tipped bit and go slow to avoid cracks.
- Masonry: Wet the drill bit to reduce dust and heat.
For heavy items, use multiple anchors and spread the load. If you need to hang something very heavy, consult a professional.
Comparing Drills For Anchor Installation
Not all drills are equal for wall anchor jobs. Here’s a comparison to help you choose:
| Drill Type | Best Use | Pros | Cons |
|---|---|---|---|
| Cordless Drill | Drywall, light jobs | Portable, easy | Battery can run out |
| Corded Drill | Masonry, heavy jobs | Powerful, consistent | Needs outlet |
| Hammer Drill | Concrete, brick | Punches through hard material | Heavier, noisy |
For most home jobs, a cordless drill works well. For masonry, rent or buy a hammer drill.
When To Call A Professional
If your wall is old, damaged, or you’re mounting something very heavy (like cabinets or a large TV), it’s wise to get professional help. Professionals have tools to find wires, pipes, and can patch walls perfectly.
You can find more detailed safety and installation advice at Family Handyman.
Frequently Asked Questions
What Is The Best Wall Anchor For Drywall?
The threaded drywall anchor is best for quick and strong support in drywall. For heavier items, use a molly bolt or toggle bolt.
Can I Install A Wall Anchor Without A Drill?
Some self-drilling anchors can be installed with just a screwdriver, but for most anchors, a drill gives a cleaner, more accurate hole.
How Do I Know If My Anchor Is Strong Enough?
Check the weight capacity listed on the anchor package. Add the weight of your item and choose an anchor rated for at least 20% more.
What If I Drill Into A Wire Or Pipe?
Stop immediately and turn off power or water. Fixing this may require professional help. Always use a stud finder with wire detection before drilling.
Can I Remove And Reuse Wall Anchors?
Most anchors are single-use. Some, like molly bolts, can be reused if removed carefully, but plastic and toggle anchors usually need replacing.
Installing wall anchors with a drill is a valuable skill for anyone who wants to hang items securely. By understanding anchor types, choosing the right tools, and following each step carefully, you can avoid mistakes and protect your walls. Remember to check for hidden hazards, match the anchor to your wall and item, and use proper technique.
With practice, your installations will be strong, neat, and safe.