Many people want more closet space but cannot drill holes in their walls or rental units. Maybe you’re renting, don’t own a power drill, or simply want a faster way to hang clothes. The good news is, you can install a closet rod without drilling—if you know the right methods and products.
This guide covers every practical way to add a closet rod without making permanent holes, step-by-step instructions for each, what to watch out for, and some helpful tips for a stable, long-lasting installation.
Why Avoid Drilling For Closet Rods?
There are several reasons why people look for no-drill closet rod options. Rental contracts often forbid drilling holes in walls or cabinets. In some homes, walls are made of materials like concrete or brick, making drilling difficult. Even in owner-occupied spaces, drilling can leave permanent damage, require expensive repairs, or simply take too much time.
No-drill closet rods are also much easier to install and remove. You can take them with you if you move, and they are ideal for temporary or semi-permanent solutions.
Main Types Of No-drill Closet Rods
Not all no-drill solutions are the same. Here are the most common types you’ll find, along with their pros, cons, and best use cases:
| Type | Best For | Weight Limit | Adjustability |
|---|---|---|---|
| Tension Rods | Standard closets, rentals | 10-25 lbs | High |
| Adhesive Rods | Light clothing, smooth walls | 5-10 lbs | Medium |
| Standing Garment Racks | Open spaces, heavy items | 50+ lbs | High |
| Expandable Pole Systems | Custom sizes, corners | 20-40 lbs | High |
| Hanging Rods | Existing closet rods | Vary by type | Medium |
Each type has its strengths and weaknesses. For example, tension rods are easy to adjust and remove, but usually cannot handle heavy coats. Standing racks offer the highest capacity, but take up floor space.
Credit: www.myrepurposedlife.com
Step-by-step: Installing A Closet Rod Without Drilling
Let’s look at the most popular no-drill options, how to install them, and important tips for each.
Tension Rods
Tension rods are the easiest and most common solution. They work by expanding a spring-loaded rod between two walls, using pressure to stay in place.
How To Install A Tension Rod
- Measure the width of your closet or space where you want the rod.
- Buy a rod that fits within your measurements. Most are adjustable, but check the package for the range (for example, 28-48 inches).
- Extend the rod to just longer than the width of your closet.
- Compress the rod and fit it between the two walls.
- Release and allow the rod to lock in place with tension.
Tips For Success
- Always check the weight limit before buying. Most tension rods only hold 10-25 pounds.
- If your walls are very smooth, consider adding rubber grips to the ends for more stability.
- Don’t overload the rod with heavy items like winter coats or bags.
Adhesive Closet Rods
Adhesive rods use special sticky pads or brackets to attach to walls or panels. These are best for lightweight clothing and smooth, painted surfaces.
How To Install An Adhesive Rod
- Clean the surface where you will stick the brackets. Use rubbing alcohol for best results.
- Mark the height for both ends, using a level to make sure the rod will be straight.
- Remove the adhesive backing and press the brackets firmly onto the wall.
- Wait at least 24 hours before adding the rod and hanging clothes. This helps the adhesive cure fully.
- Insert the rod into the brackets.
Practical Insights
- These rods are great for children’s closets or as a secondary rod for lightweight shirts.
- Do not use on textured or dusty walls—they won’t stick well.
- Some brands allow you to remove the adhesive without damage, but always check reviews first.
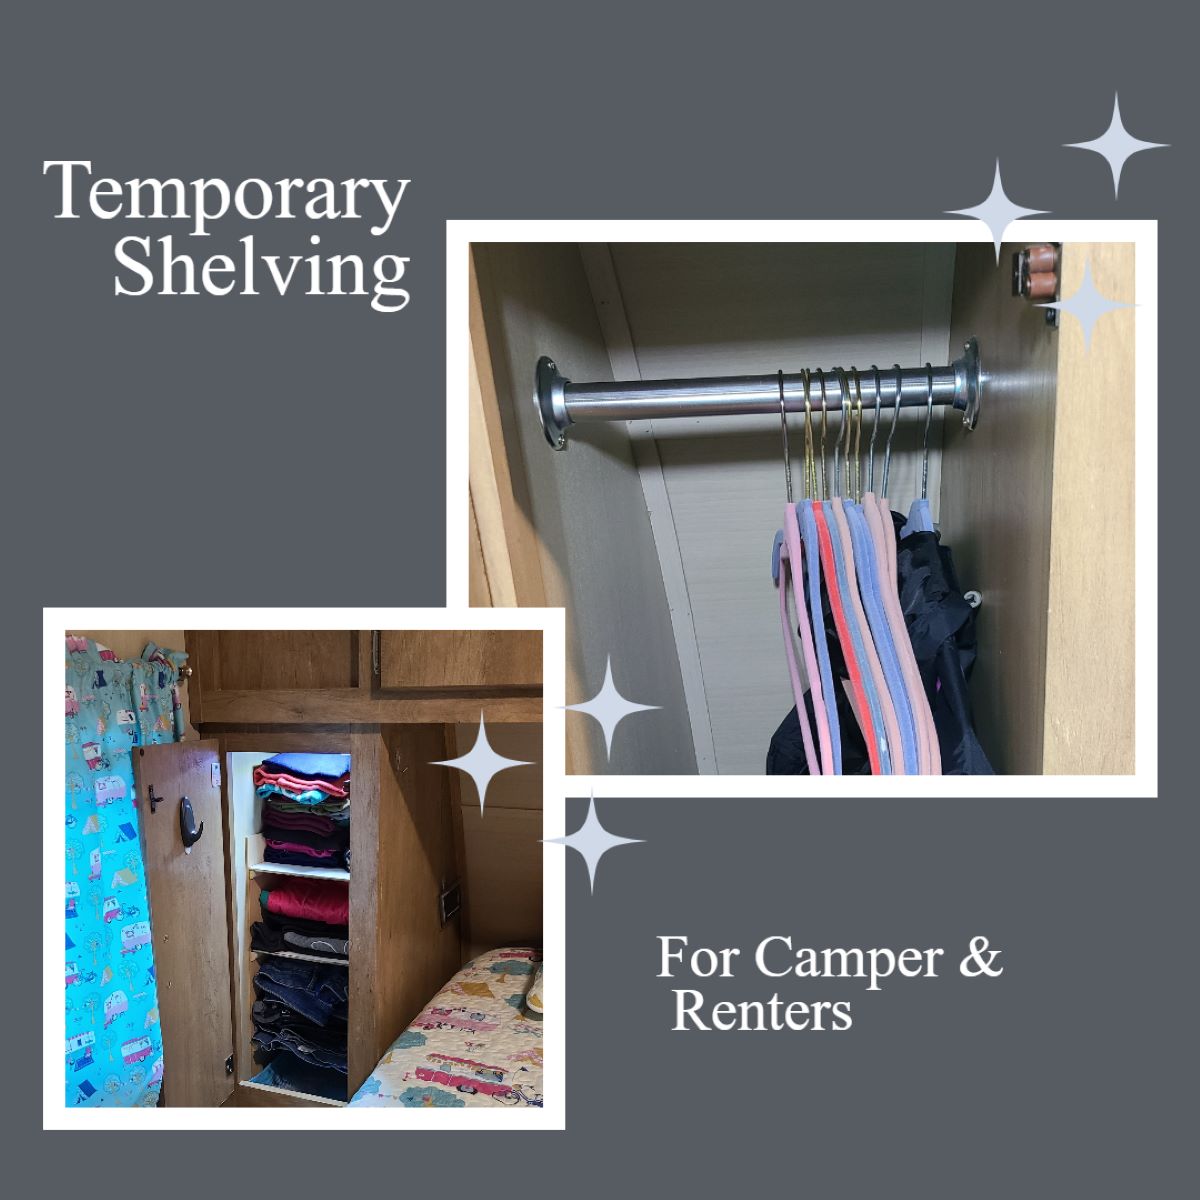
Standing Garment Racks
A standing garment rack is not a true closet rod, but it serves the same purpose—without touching your walls at all.
Setting Up A Garment Rack
- Buy a rack sized for your space. Popular brands offer single and double-rod designs.
- Assemble the frame using the instructions included. Most don’t need tools, just sliding or snapping the parts together.
- Adjust the height if possible.
- Add the rod(s) and make sure everything is stable.
- Place the rack in your closet or bedroom.
Benefits And Limitations
- Can hold much more weight than tension or adhesive rods—often up to 100 pounds.
- Easy to move, reconfigure, or expand with extra shelves.
- Takes up floor space, so not ideal for very small closets.
Expandable Pole Systems
Some brands sell expandable pole systems that press between the floor and ceiling, creating a “vertical tension” mount. These can hold one or more rods and often include shelves.
How To Set Up
- Measure the height of your closet from floor to ceiling.
- Assemble the pole system per the instructions.
- Extend the pole until it presses firmly between floor and ceiling.
- Attach the rod holders at your desired height and add the rod.
- Test the stability before hanging clothes.
When To Use
- Perfect for awkward spaces where standard rods won’t fit.
- Stronger than most wall-to-wall tension rods.
- Make sure both floor and ceiling are flat and sturdy.
Hanging Rods For Existing Closets
If your closet already has a rod, you can hang a second rod below it using special hooks or adjustable hangers. These are sometimes called “double hang rods.”
Quick Installation
- Buy a double hang rod or a set of rod hooks.
- Hang the hooks over the existing closet rod.
- Attach the second rod to the hooks.
- Adjust the height if the rod is extendable.
Useful Details
- Instantly doubles your hanging space for shirts, skirts, or kids’ clothes.
- No wall space needed—just an existing rod.
- Not suitable if your current rod is already overloaded.
Choosing The Right No-drill Closet Rod
Picking the best no-drill closet rod depends on your closet, how much clothing you want to hang, and your wall type.
| Situation | Best Option |
|---|---|
| Rental apartment, standard closet | Tension rod |
| Lots of heavy coats | Standing garment rack |
| Children’s room | Adhesive rod or double hang rod |
| Odd-shaped or corner closet | Expandable pole system |
| Add more space to existing rod | Hanging/double rod |
If you’re not sure, start with a tension rod. It’s easy to find, inexpensive, and leaves no marks if you decide to upgrade later.

Credit: www.wikihow.com
Common Mistakes To Avoid
Even simple installations can go wrong. Watch out for these frequent errors:
- Ignoring weight limits. Most tension and adhesive rods are not made for heavy items. Overloading can cause the rod to fall, damaging your clothes and walls.
- Poor surface preparation. For adhesive rods, any dust or oil can prevent proper sticking. Always clean well and wait the full curing time.
- Uneven installation. Use a level to make sure your rod is perfectly straight. Crooked rods cause hangers to slide and can stress the supports.
- Skipping instructions. Each product is different. Read the instructions before starting, especially for expandable or pole systems.
- Not testing stability. Before hanging expensive clothes, gently pull down on the rod to check if it will slip or fall.
Non-obvious Insights For Beginners
Many first-timers don’t realize that:
- Wall texture matters. Smooth, painted walls give better grip for both tension and adhesive rods. Textured or wallpapered surfaces are often slippery, and adhesive may peel paint.
- Climate affects adhesives. High humidity or temperature changes can weaken adhesive strength. If you live in a humid climate, tension or standing racks may be safer.
- Rubber ends help. Upgrading to a tension rod with non-slip rubber ends can prevent sliding, especially on smooth panels or tile.
- Use closet rod covers. For metal rods, a simple plastic cover can prevent rust stains on clothing and reduce noise.
Maintenance And Longevity
A no-drill closet rod can last for years if you:
- Check stability every few months, especially if you hang heavy or wet items.
- Clean adhesive areas gently if you need to move or adjust the rod.
- Lubricate metal joints on standing racks to prevent rust and squeaks.
- Store spare parts (extra hooks, screws, or end caps) in a labeled bag for easy repairs.
When To Call A Professional
While most no-drill rods are designed for DIY, consider professional help if:
- You have very heavy storage needs (suits, coats, or commercial use).
- Your closet is unusually shaped or has weak walls/ceiling.
- You need a custom-built solution for a walk-in closet.
A pro can recommend stronger, semi-permanent options that still avoid drilling, like clamp systems or freestanding organizers.

Credit: www.walmart.com
Extra Tips For A Better Closet
- Add shelf liners above your rod for folded items.
- Use slim hangers to maximize space on small rods.
- Install LED closet lights for better visibility without wiring.
If you want more details about closet organization and no-drill hardware, you can check resources like The Spruce for helpful guides.
Frequently Asked Questions
What Is The Strongest No-drill Closet Rod Option?
The standing garment rack is usually the strongest, holding 50-100 pounds or more, because it stands on the floor and doesn’t rely on wall support.
Can I Use A No-drill Rod For Heavy Winter Coats?
Most tension rods and adhesive rods are not designed for heavy coats. Use a standing rack or a reinforced expandable system for best results.
Will Tension Rods Damage My Walls?
If used correctly, tension rods usually do not damage walls. However, on very soft or painted surfaces, they can leave small marks or dents. Rubber ends help prevent this.
How Do I Keep An Adhesive Rod From Falling?
Clean the surface well, wait the full curing time before adding weight, and never overload the rod. Avoid placing on textured or humid walls.
Are There Closet Rods For Corner Spaces Without Drilling?
Yes, expandable pole systems and some specialty racks are designed for corners and odd-shaped closets. Look for products labeled “adjustable” or “corner fit.”
Installing a closet rod without drilling is simple once you understand your options. By choosing the right type, preparing your surfaces, and following the steps above, you can enjoy more closet space—without damaging walls or breaking lease agreements. Whether you’re a renter, a student, or just want a quick upgrade, no-drill rods make organizing your clothes easy and flexible.