Installing a new bathroom faucet is one of the fastest ways to update your bathroom’s look and feel. The process may seem difficult if you’ve never done it before, but with the right tools, guidance, and a little patience, you can install a Delta bathroom faucet in just a few hours. Whether you’re replacing an old leaky faucet or adding a modern touch to your bathroom, this guide explains everything you need to know. You’ll discover practical tips, common mistakes to avoid, and step-by-step instructions that make the job easier, even for beginners.
Why Choose A Delta Bathroom Faucet?
Delta is a trusted name in the plumbing industry, known for making reliable and stylish faucets. Many homeowners choose Delta because their faucets offer:
- Durability: Quality materials that last for years
- Easy installation: Most models come with clear instructions and helpful features
- Water efficiency: Many Delta faucets save water without losing pressure
Choosing a Delta bathroom faucet means you’re investing in both style and function. Plus, you’ll find a wide range of designs to fit almost any bathroom.
Tools And Materials You Will Need
Before starting, gather all the necessary tools and materials. This helps the installation go smoothly and reduces frustration. Here’s what you’ll need:
- Adjustable wrench
- Basin wrench (helpful for tight spaces)
- Phillips and flathead screwdriver
- Plumber’s tape (Teflon tape)
- Bucket or towel (to catch water)
- Flashlight (for low-light areas)
- Safety glasses
- Plumber’s putty or silicone sealant (check faucet instructions)
- Cleaning cloth
Delta faucets usually include all the mounting hardware and supply lines, but double-check the box before you begin.
Prepare Your Workspace
Preparation can make a big difference, especially if you’re new to DIY projects. Here’s how to get ready:
- Turn off the water supply: Look under your sink for two shutoff valves—one for hot water and one for cold. Turn both clockwise to close.
- Relieve pressure: Open the faucet to let any remaining water drain out.
- Clear the area: Remove items from under the sink so you have room to work.
- Protect the area: Place a towel or bucket under the supply lines to catch any drips.
A common mistake is forgetting to turn off the water. This can lead to a sudden mess, so always double-check.
Remove The Old Faucet
Taking out the old faucet is sometimes the trickiest part, especially if parts are rusty or stuck. Here’s how to do it:
- Disconnect water supply lines: Use your wrench to loosen the nuts connecting the supply lines to the faucet.
- Remove mounting nuts: Under the sink, locate and unscrew the nuts that hold the faucet in place.
- Detach the lift rod (if present): This is the lever that opens and closes the drain. Disconnect it from the faucet.
- Lift out the old faucet: Gently pull the faucet up and away from the sink.
- Clean the surface: Wipe away old plumber’s putty, sealant, and dirt.
If you find corroded parts, spray a little penetrating oil and wait a few minutes. This often makes removal much easier.
Check Your Sink Type
Bathroom sinks come with different hole configurations. Most Delta faucets fit one of these:
- Single-hole: One opening in the sink
- Centerset (4-inch): Three holes, 4 inches apart
- Widespread (8-inch): Three holes, 8 inches apart
It’s important to match your new faucet to your sink’s configuration. If you’re unsure, measure the distance between the holes.
| Sink Type | Number of Holes | Distance Between Holes |
|---|---|---|
| Single-hole | 1 | N/A |
| Centerset | 3 | 4 inches |
| Widespread | 3 | 8 inches |
Some Delta faucets come with an escutcheon plate (a base plate) to cover extra holes. Make sure you have the right parts before moving forward.
Install The New Delta Faucet
Now you’re ready to install your new faucet. Follow these steps:
- Read the instructions: Delta faucets include a manual with clear diagrams. Always check for model-specific steps.
- Set the gasket or putty: Place the rubber gasket or apply plumber’s putty where the faucet will sit. This helps prevent leaks.
- Position the faucet: Insert the faucet through the sink holes. If you’re using an escutcheon plate, put it in place first.
- Secure underneath: Go under the sink and hand-tighten the mounting nuts. Use a wrench for a snug fit, but don’t overtighten.
- Attach supply lines: Connect the hot and cold water supply lines to the faucet and the shutoff valves. Wrap threads with plumber’s tape for a better seal.
- Install the lift rod: If your faucet includes a pop-up drain, connect the lift rod mechanism.
- Check alignment: Make sure the faucet is straight before fully tightening everything.
Example: Centerset Faucet Installation
If you have a centerset Delta faucet, the installation is straightforward. The faucet and handles are usually combined in a single unit. Set the unit in place, secure from below, and hook up the water lines.
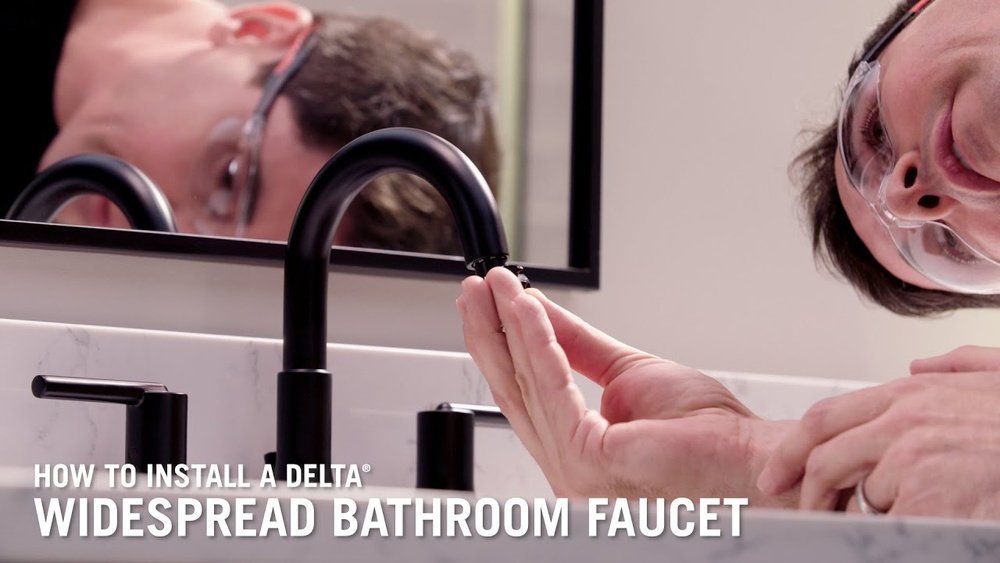
Example: Widespread Faucet Installation
A widespread faucet has separate handles and spout. Position each part in the correct hole, then connect the water lines and mounting hardware as shown in the instructions.
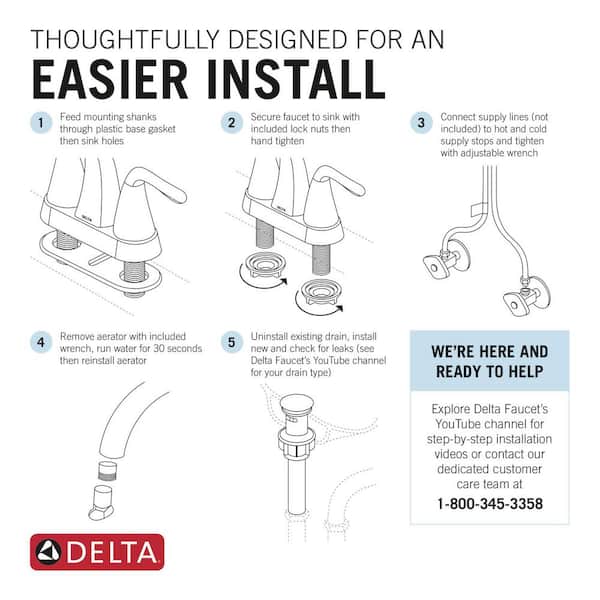
Credit: www.homedepot.com
Install The Drain Assembly
Most Delta bathroom faucets come with a matching drain assembly. Installing the drain is just as important as the faucet itself.
- Remove the old drain: Loosen the nut under the sink, then lift out the drain flange.
- Apply sealant: Put a bead of plumber’s putty or silicone around the new drain flange.
- Insert the drain: Place the flange in the sink’s drain hole, pressing down firmly.
- Tighten from below: Screw the drain body onto the flange from under the sink.
- Connect the pop-up rod: Attach the rod to the lift mechanism so the drain opens and closes smoothly.
- Wipe away excess putty: After tightening, remove any extra putty or sealant.
A common mistake is forgetting to test the drain for leaks. Fill the sink with water, then release it and check for drips under the sink.
Connect Water Supply Lines
Connecting water lines may seem simple, but doing it right prevents future leaks.
- Wrap plumber’s tape around the threads of the faucet and shutoff valve connections.
- Attach the supply lines, turning the nuts by hand first, then use a wrench to snug them up.
- Don’t overtighten—this can crack the fittings.
If your supply lines are old or worn, consider replacing them. Flexible braided lines are reliable and easy to install.
| Material | Pros | Cons |
|---|---|---|
| Braided Stainless Steel | Flexible, durable, easy to install | More expensive |
| Plastic | Cheap, lightweight | Less durable, can kink |
| Copper | Very durable, long-lasting | Hard to bend, difficult for beginners |
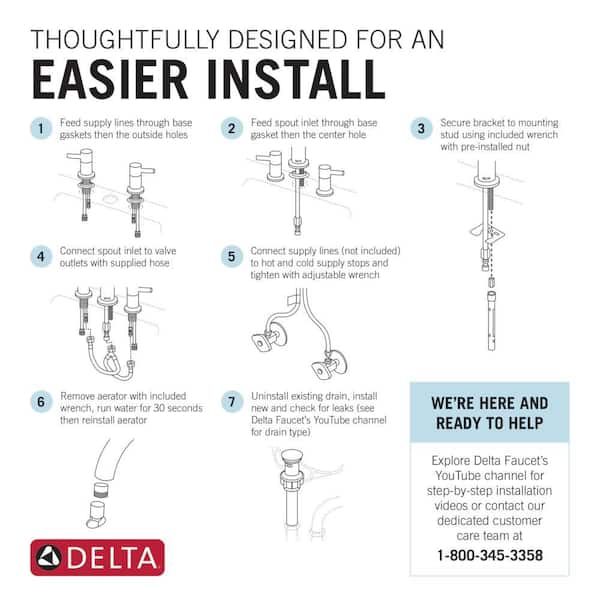
Credit: www.homedepot.com
Test Your Installation
Before you put away your tools, it’s important to test everything.
- Turn on the water supply valves: Open both hot and cold valves slowly.
- Check for leaks: Look under the sink and around the faucet base.
- Run the faucet: Let water flow for a minute to clear any debris.
- Test the drain: Fill the sink, then release the water and check the drain for leaks.
If you see any leaks, gently tighten the connections. If leaks continue, turn off the water and check for damaged washers or misaligned parts.
Clean Up And Final Touches
Once you’re sure everything works, clean up your workspace:
- Remove tools and old parts
- Wipe down the faucet and sink
- Replace items under the sink
If your faucet came with a special finish, follow the care instructions to keep it looking new.
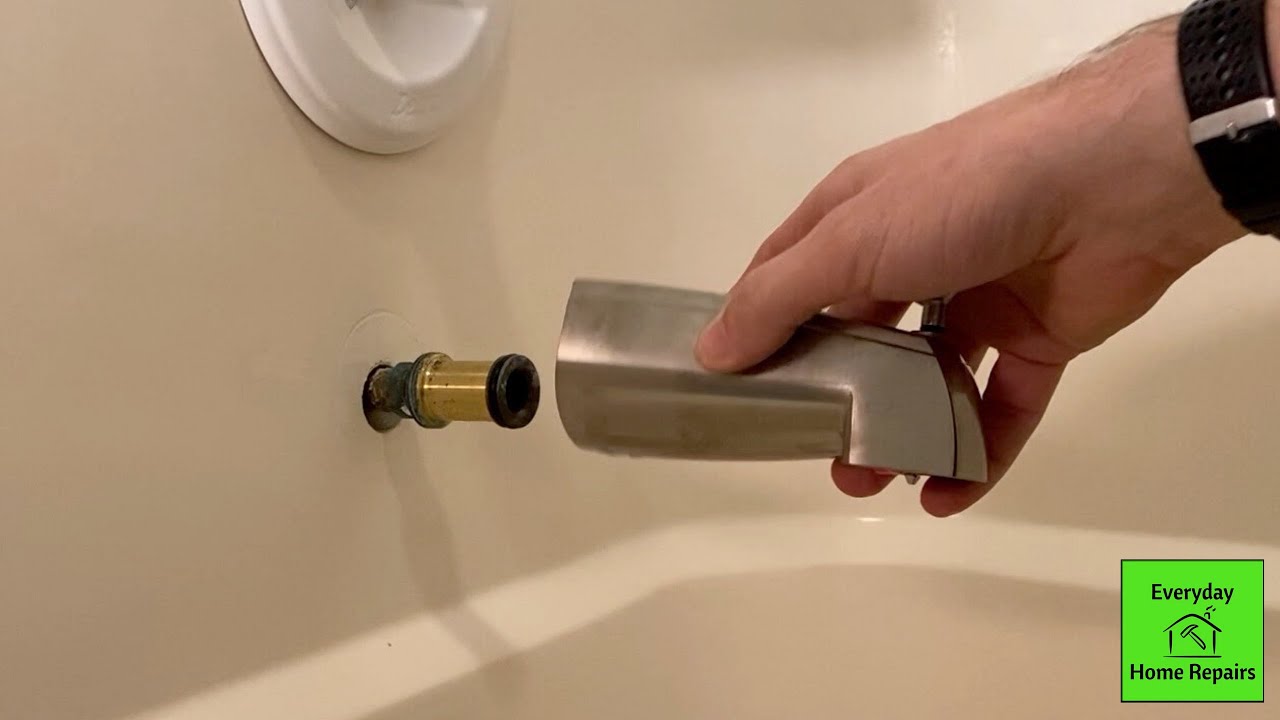
Credit: www.youtube.com
Two Common Mistakes Beginners Make
- Skipping the instructions: Even if you’ve installed faucets before, every model is a bit different. Reading the manual helps you avoid surprises.
- Overtightening connections: Many leaks are caused by overtightened nuts or supply lines. Tighten until snug, not more.
Practical Tips For A Smooth Installation
- Take photos as you remove the old faucet. These pictures can help you remember how parts fit together.
- If your water lines are hard to reach, a basin wrench can save a lot of time.
- Check for leaks again after a day or two. Sometimes small drips only appear after the faucet has been used several times.
When To Call A Professional
Installing a Delta bathroom faucet is usually a DIY-friendly job. However, if you encounter:
- Corroded or damaged pipes
- Difficult-to-remove old faucets
- Unexpected leaks after installation
…it might be best to call a licensed plumber. Sometimes, underlying problems need expert attention.
Benefits Of Upgrading To A Delta Faucet
Many homeowners are surprised by the improvements after installing a new Delta faucet:
- Better water flow and pressure
- Modern design and finish
- Easier cleaning and maintenance
- Improved water efficiency
Investing in a quality faucet often increases your home’s value and your everyday comfort.
Comparing Delta Models
If you’re still deciding which Delta faucet to buy, it helps to compare some key features.
| Model | Finish Options | Flow Rate (GPM) | Special Features |
|---|---|---|---|
| Delta Lahara | Chrome, Stainless, Bronze | 1.2 | Diamond Seal Technology |
| Delta Trinsic | Matte Black, Champagne Bronze | 1.2 | Touch2O Technology |
| Delta Windemere | Chrome, Oil Rubbed Bronze | 1.5 | Pop-up Drain Included |
For more model information and installation videos, you can visit the official Delta Faucet website.
Keeping Your Delta Faucet In Top Condition
Proper care extends the life of your faucet. Here’s how:
- Clean with mild soap and water; avoid harsh chemicals.
- Dry with a soft cloth to prevent water spots.
- Check for leaks every few months.
- Replace washers or seals if you notice drips.
Frequently Asked Questions
How Long Does It Take To Install A Delta Bathroom Faucet?
Most homeowners can install a Delta bathroom faucet in 1 to 2 hours. If you need to remove an old faucet or encounter problems, it may take longer. Taking your time and following instructions helps prevent mistakes.
Do I Need Plumber’s Putty Or Silicone For My Delta Faucet?
Many Delta faucets include a rubber gasket that seals the faucet to the sink. For some models or for extra protection, you can use plumber’s putty or silicone sealant. Always check the instructions that come with your faucet.
Can I Install A Delta Bathroom Faucet Without Special Tools?
Basic tools like an adjustable wrench and screwdriver are enough for most installations. A basin wrench can be helpful for tight spaces, but isn’t always required. Avoid using tools that may damage the finish.
What If My Supply Lines Don’t Fit The New Faucet?
Supply line connections can vary in size. If your existing lines don’t fit, you may need to buy new ones. Flexible braided stainless steel lines are recommended for most modern Delta faucets.
Is It Safe To Install A Faucet If I’ve Never Done It Before?
Yes, many people install Delta bathroom faucets successfully on their first try. Read the instructions carefully, watch online tutorials, and don’t rush. If you run into major problems, it’s okay to call a professional.
Installing a Delta bathroom faucet is a smart way to refresh your bathroom and improve daily convenience. With careful preparation, the right tools, and these step-by-step tips, you’ll have a stylish and leak-free faucet you can trust for years.