Replacing or installing a drain in a bathroom sink is a task many homeowners face. Whether you have a leaky drain, an old one with rust, or you’re simply updating your bathroom look, learning to do this yourself can save money and give a sense of achievement. Many people think it’s a job for a plumber, but with the right steps and some patience, most can handle it. This guide will show you, step by step, how to install a drain in your bathroom sink safely and successfully. You’ll learn what tools to use, tips to avoid leaks, and how to solve problems that might come up.
What You Need Before You Start
Before you begin, gather all the necessary tools and materials. Having everything ready will make the job smoother and faster.
Tools And Materials
- Adjustable wrench
- Plumber’s putty or silicone caulk
- Plumber’s tape (Teflon tape)
- Bucket or bowl
- Old towels or rags
- Screwdriver
- Utility knife (if needed)
- New sink drain assembly
- Pliers (optional)
- Cleaning supplies (sponge, mild cleaner)
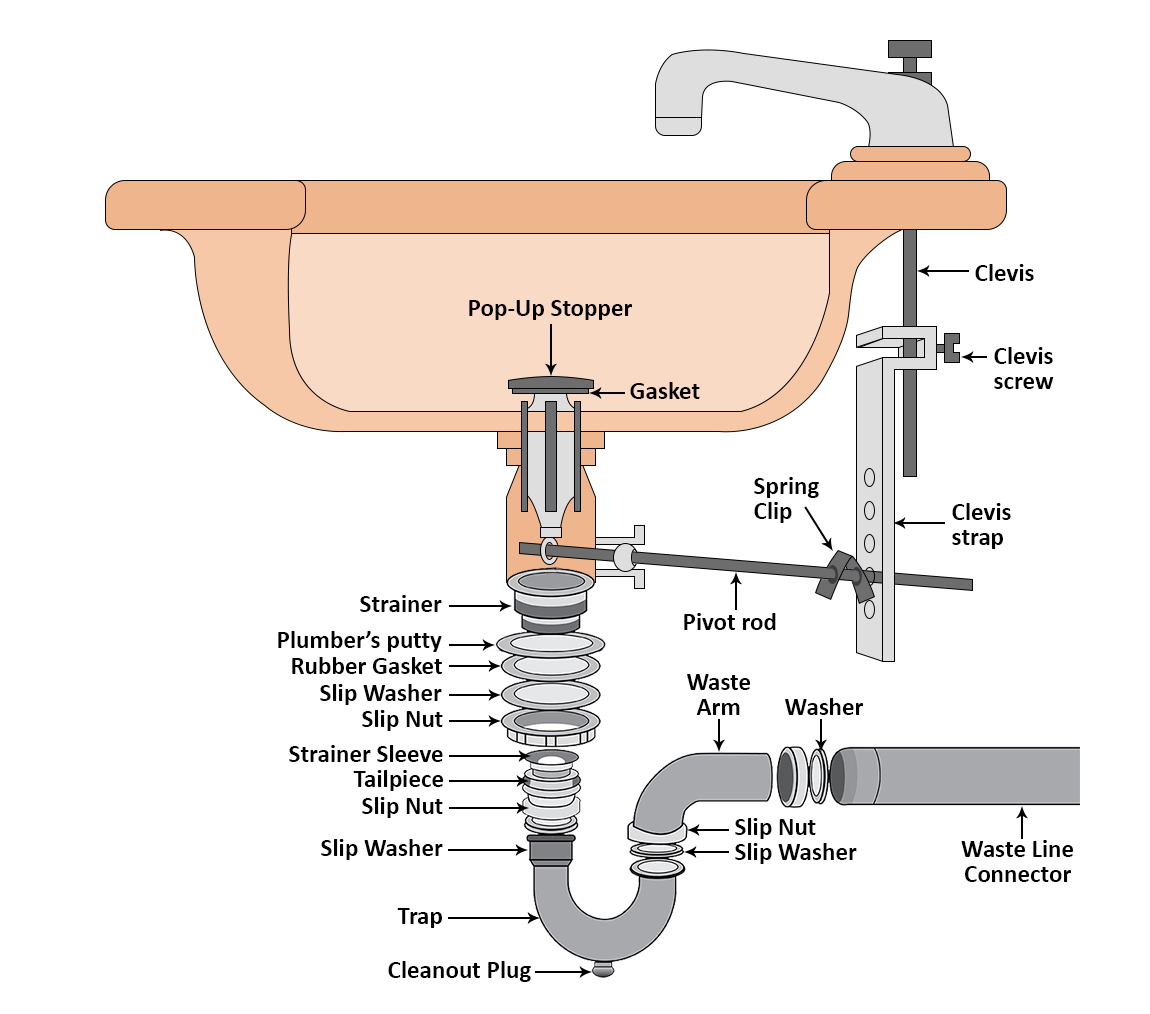
Check if your drain assembly matches your sink type. There are two common types: pop-up drains and grid drains. Pop-up drains have a stopper you can open and close; grid drains do not.
Removing The Old Drain
The first step is to take out the old drain. This part can be messy, so put a bucket under the sink to catch any water.
- Turn off the water supply. While you don’t usually need to shut off the water for drain work, it’s safer if you’re new to plumbing.
- Remove everything from under the sink. Place a towel and bucket below the drain to catch spills.
- Disconnect the drain trap (the curved pipe). Use your wrench or pliers to loosen the slip nuts at both ends. Carefully lower the trap and pour out water.
- If your drain has a pop-up stopper, unscrew or pull out the rod mechanism under the sink.
- Loosen the locknut that holds the drain body to the sink. You might need the wrench for this. Once loose, push the drain up and out from the top.
- Clean the sink hole thoroughly. Remove old putty, grime, and mineral deposits with a sponge or utility knife.
Preparing The New Drain
Every new drain kit includes several parts: a drain body, a flange (the visible ring at the top), gaskets, washers, and a locknut. For pop-up drains, you’ll also have the lift rod and stopper pieces.
Checking Compatibility
Before you install, make sure the new drain fits your sink’s hole. Most bathroom sinks use a standard 1-1/4 inch or 1-1/2 inch hole. If your new drain is too large or too small, it won’t seal properly.
Sealing For Leaks
You’ll need a sealing material to prevent leaks. Most plumbers use plumber’s putty, but some modern sinks (like stone or composite) need silicone caulk instead. Check your sink’s instructions to avoid damage.
Installing The New Sink Drain
This is where careful steps matter most. Follow these instructions for a leak-free installation.
1. Apply Sealing Material
Roll a small amount of plumber’s putty into a rope about the thickness of a pencil. Place it around the underside of the drain flange (the part that will sit on top of the sink). If using silicone, apply a thin bead instead.
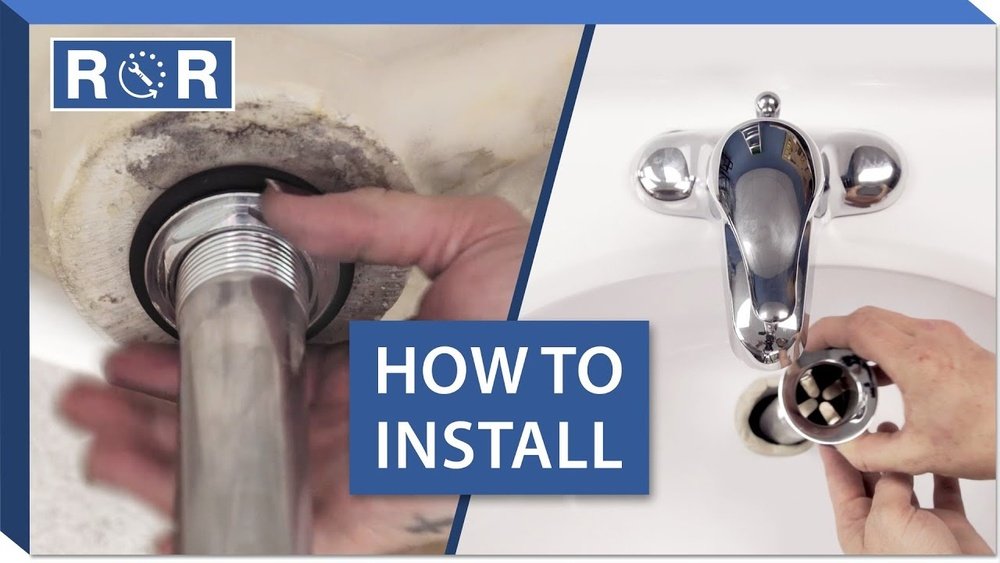
2. Insert The Drain Body
Push the drain body down through the sink’s drain hole from above. Press firmly to squeeze out excess putty or caulk. This creates a watertight seal at the top.
3. Position Gasket And Washer
From underneath the sink, slide on the rubber gasket and then the metal washer onto the drain body. Some kits use only one washer; others have two. Check your instructions.
4. Tighten The Locknut
Screw the locknut onto the drain body by hand. Use the adjustable wrench to tighten it snugly, but do not over-tighten, as this can crack porcelain sinks. As you tighten, extra putty or silicone may squeeze out—wipe it away with a rag.
5. Reinstall The Drain Trap
Reconnect the P-trap to the new drain tailpiece. Wrap plumber’s tape around the threads if you see any, to ensure a watertight fit. Hand-tighten the slip nuts, then give a slight turn with pliers if needed.
6. Install Pop-up Stopper (if Applicable)
If your drain includes a pop-up stopper:
- Drop the stopper into the drain from above.
- Under the sink, insert the horizontal rod into the hole in the drain body, then attach the clip and nut.
- Connect the rod to the vertical lift rod using the spring clip.
- Test the stopper to make sure it moves up and down smoothly.
:max_bytes(150000):strip_icc()/SPR-bathroom-sink-drain-installation-2718843_03_jointcompound_4713-78eae200ba9645088f15a42d0138ade9.jpg)
Credit: www.thespruce.com
Testing For Leaks
With everything in place, it’s time to check your work.
- Remove the bucket and towels from under the sink.
- Run water into the sink for several minutes.
- Check underneath for any signs of water around the drain and trap connections.
- If you see a leak, turn off the water and tighten the connections. If the leak is around the drain flange, you may need to reapply putty or caulk.
Common Leak Sources
- Loose locknut
- Poorly seated gasket
- Cracked washer
- Too little or too much plumber’s putty
If you still have trouble, disassemble the drain and repeat the process, making sure all parts are aligned and clean.
Useful Tips For A Professional Result
- Always clean the sink hole thoroughly before installation. Even small debris can cause leaks.
- Use only as much plumber’s putty as needed. Too much can make the drain hard to tighten.
- If your old drain was metal and the new one is plastic, be gentle when tightening to avoid damage.
- Test the pop-up mechanism several times before finishing, as adjustments are easier before the trap is reattached.
- If you have a vessel sink (sits on top of the counter), you may need a special drain without overflow holes.
Data Table: Common Drain Sizes And Types
Understanding drain size is important for a proper fit. Here is a comparison of popular bathroom sink drain types and sizes.
| Drain Type | Standard Diameter | Best For | Has Stopper? |
|---|---|---|---|
| Pop-up Drain | 1-1/4″ or 1-1/2″ | Most modern sinks | Yes |
| Grid Drain | 1-1/4″ | Vessel sinks, public restrooms | No |
| Lift-and-Turn Drain | 1-1/2″ | Traditional/antique sinks | Yes |
Comparing Plumber’s Putty And Silicone Caulk
Choosing the right sealant is important to prevent leaks and protect your sink. Here’s how the two most common options compare:
| Sealant | Best For | Pros | Cons |
|---|---|---|---|
| Plumber’s Putty | Porcelain, metal sinks | Easy to use, removable | Not for stone/composite sinks |
| Silicone Caulk | Stone, glass, composite sinks | Waterproof, strong seal | Harder to remove, longer curing time |
Mistakes To Avoid
Many beginners run into problems that could have been prevented:
- Over-tightening the locknut: This can crack porcelain or plastic sinks. Tighten just until snug.
- Skipping the sealant: Even a small gap allows leaks. Always use putty or silicone as recommended.
- Using the wrong drain size: Measure your sink opening carefully before buying a new drain.
- Not checking for leaks: Always test with running water before putting your tools away.
- Forgetting to clean surfaces: Old putty or grime under the flange leads to leaks.
Non-obvious Insights For A Better Installation
- Don’t reuse old gaskets or washers. Even if they look fine, old rubber can become hard or brittle, leading to leaks later. Always use the new parts included in your drain kit.
- Account for overflow holes. Some bathroom sinks have an overflow channel (small holes near the top). Make sure your new drain has matching openings, or water will not drain properly and may cause odors.
Credit: gharpedia.com
When To Call A Professional
While most people can install a bathroom sink drain with patience, there are times when you should call a plumber:
- Your drain pipes are old and corroded.
- The sink itself is cracked or damaged.
- You see water damage or mold under the sink.
- The trap or drain connections don’t match standard sizes.
A professional can also help if you’re installing a sink in a brand-new spot and need to connect to the main plumbing.
Cost And Time Estimates
Installing a new bathroom sink drain is not expensive if you do it yourself. The average cost for a new drain assembly is $15-$40 USD. If you hire a plumber, expect to pay $100-$250 USD for labor.
Most homeowners can complete the job in 30 to 60 minutes if there are no surprises. Extra time may be needed for cleaning or dealing with stuck parts.
Environmental Considerations
If your old drain is metal, consider recycling it. Avoid washing old putty or chemicals down the sink, as they can harm pipes and the environment. Use a damp rag to clean up, and dispose of waste properly.
For more information on plumbing best practices, visit the Family Handyman for expert advice and step-by-step visuals.
Frequently Asked Questions
How Do I Know If I Need A New Bathroom Sink Drain?
If your current drain is leaking, rusted, or does not match your new sink fixtures, it’s time for a replacement. Also, if water drains slowly even after cleaning, there might be a blockage or corrosion in the drain assembly.
Can I Use Silicone Instead Of Plumber’s Putty?
Yes, silicone can be used, especially for sinks made of stone or composite materials. It creates a strong, waterproof seal but is harder to remove if you need to replace the drain later.
How Tight Should The Drain Locknut Be?
Tighten the locknut until it feels snug and secure, but do not over-tighten. Over-tightening can crack sinks or strip threads. Usually, hand-tight plus a small turn with a wrench is enough.
What If My New Drain Doesn’t Fit The Sink Hole?
Check the drain and sink hole measurements before buying. If you’ve already bought the wrong size, you may need an adapter or a different drain assembly. Do not force a drain that doesn’t fit, as this will cause leaks.
How Often Should I Replace My Bathroom Sink Drain?
Most drains last 10-15 years or longer if maintained well. Replace the drain if you notice leaks, rust, or if the stopper mechanism stops working.
Replacing a bathroom sink drain may seem complicated, but taking it step by step makes it manageable for most people. Proper preparation, careful sealing, and thorough testing are the keys to a successful, leak-free installation. With patience, you can improve your bathroom’s function and appearance, and maybe even inspire yourself to take on more DIY projects in the future.

Credit: prettyhandygirl.com