Many people want to update their windows with blinds but worry about making holes in their walls or window frames. Maybe you are renting, or you just want to avoid damaging your home. The good news is that you can install blinds without drilling.
Modern solutions are easy, safe, and look just as good as traditional methods. If you want privacy, shade, or a more stylish room, you can do it all—without a drill. Let’s explore the best ways to install blinds without drilling, what to consider, and how to get the best results.
Why Choose Drill-free Blinds?
You might wonder why so many people prefer drill-free blinds. There are several reasons:
- No damage: You won’t leave holes or marks on your walls or window frames.
- Perfect for renters: Most landlords want walls to stay untouched, and you can easily remove these blinds when moving out.
- Quick and easy: No need for power tools, screws, or complex measurements.
- Safe for certain surfaces: Some window frames, like PVC or aluminum, can be damaged by drilling.
These benefits have made no-drill blinds a popular choice, especially for apartments or newer homes.
Main Types Of No-drill Blinds
There are three main ways to install blinds without drilling. Each has its own advantages and best uses. Here’s a look at the most common types:
1. Tension-fit Blinds
Tension-fit blinds use a spring-loaded system that holds the blind in place by pushing against the sides of the window frame. You simply adjust the length to fit your window, then place the blind inside the frame.
Pros:
- No tools needed
- Easy to remove and adjust
- Great for smaller windows
Cons:
- May not work well on very large or heavy blinds
- Can lose grip if not installed tightly
Example: Many blackout roller blinds for bedrooms use tension rods for easy setup.
2. Magnetic Blinds
Magnetic blinds use strong magnets to attach directly to metal window frames or doors. They are popular for steel doors or windows with a metal surface.
Pros:
- Quick to attach and remove
- No marks or residue
- Very stable if magnets are strong
Cons:
- Only works on metal surfaces
- May not support heavy blinds
Example: Magnetic mini-blinds are common for steel entry doors.
3. Adhesive Or Stick-on Blinds
Adhesive blinds use a strong sticky strip or tape along the top rail. You peel off the backing and press the blind into place.
Pros:
- Works on almost any smooth surface
- Very easy to install
- No special tools or skills needed
Cons:
- Less suitable for humid or greasy environments (like kitchens)
- Adhesive may leave residue if not removed carefully
Example: Many temporary paper or fabric blinds use adhesive strips for quick window coverage.
Credit: dubaicurtainsandblinds.ae
Choosing The Right Drill-free Blinds
Picking the right type of no-drill blinds depends on your needs and window type. Here are some important factors to consider:
- Window Material
- Metal? Consider magnetic blinds.
- PVC or wood? Tension-fit or adhesive blinds work best.
- Window Size
- Large windows may need extra-strong tension or adhesive.
- Small to medium windows are suitable for all types.
- Weight of the Blind
- Heavier blinds need stronger support (strong tension or magnets).
- Light blinds are fine with basic adhesive strips.
- Room Conditions
- In humid rooms (bathroom, kitchen), adhesive may not last long.
- For bedrooms or living rooms, any type is usually fine.
- Ease of Removal
- If you plan to take the blinds down often, tension or magnetic types are best.
Here’s a side-by-side comparison to help you choose:
| Type | Best For | Strength | Ease of Removal |
|---|---|---|---|
| Tension-fit | Small to medium windows | Moderate | Very easy |
| Magnetic | Metal frames/doors | Strong (on metal) | Very easy |
| Adhesive | Any smooth surface | Varies | Easy (may leave residue) |
What You Need Before Starting
Before you install your no-drill blinds, gather these basic supplies:
- Measuring tape
- Pencil or marker (for light marks, if needed)
- Step stool or ladder (for tall windows)
- Cleaning supplies (for removing dust/oil from window frame)
- The blinds and any included parts
Always read the manufacturer’s instructions carefully. Not all blinds are installed the same way, even if they look similar.
Credit: b-sidefilms.com
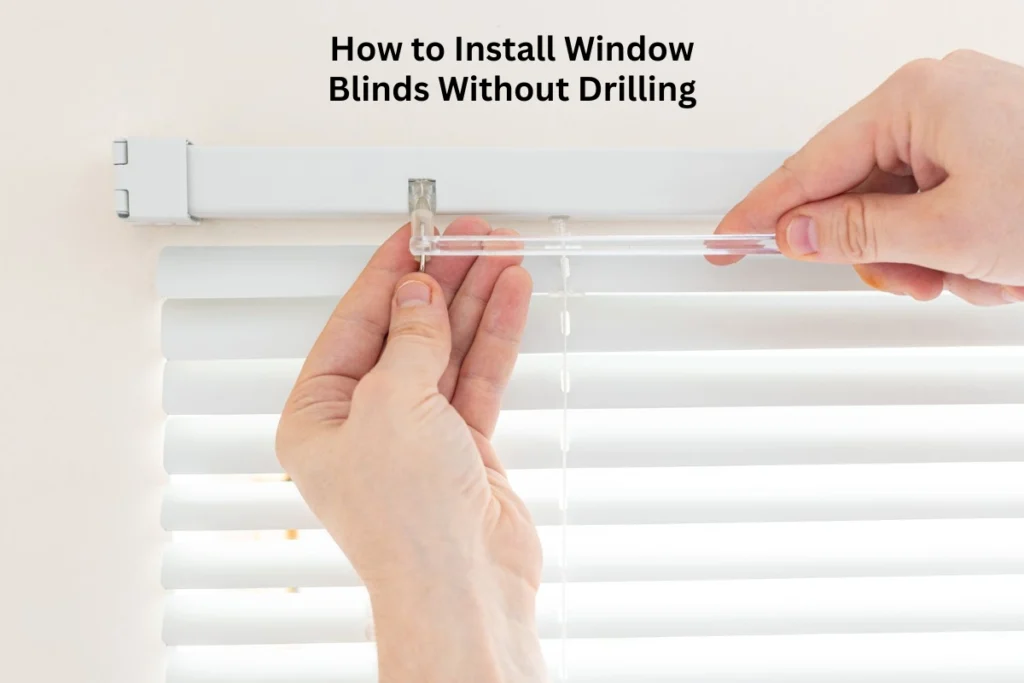
How To Install Tension-fit Blinds (step-by-step)
Tension-fit blinds are one of the easiest options. Here’s how to install them:
1. Measure The Window
Measure the width of your window frame from inside edge to inside edge. Write down the measurement.
2. Adjust The Blind
Extend the tension rod or side arms of the blind to match the width you measured. Some models have a spring-loaded bar, while others twist to expand.
3. Clean The Window Frame
Wipe the inside edges of the window frame to remove dust or oils. This ensures a good grip.
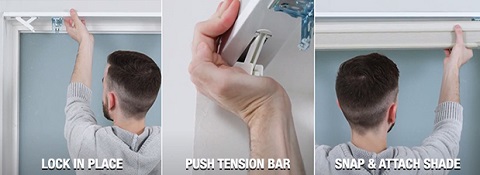
4. Insert The Blind
Place one end of the blind inside one side of the window frame. Compress the tension rod and slide the other end into the opposite side.
5. Check The Fit
Release the tension so the rod pushes against both sides. The blind should feel snug but not so tight it bends the frame.
6. Test The Operation
Pull the blind up and down (if it’s a roller or Venetian style) to make sure it moves smoothly.
Pro tip: If your window is slightly uneven, place a small piece of soft rubber or felt under one end of the rod for a tighter fit.
How To Install Magnetic Blinds
Magnetic blinds are perfect for metal doors and frames. Here’s how to do it:
1. Check For Metal
Use a magnet or check the manufacturer’s label to make sure your window or door is metal.
2. Clean The Surface
Wipe the area where the magnets will attach. Remove dust, oil, or loose paint.
3. Attach The Magnetic Brackets
Most magnetic blinds come with brackets that snap to the metal surface. Place the brackets at the top and sides according to the instructions.
4. Hang The Blind
Attach the blind to the brackets. Some blinds snap in, while others use hooks.
5. Test For Stability
Pull gently on the blind to make sure the magnets hold well.
Tip: If the magnets feel weak, you can buy extra-strong adhesive magnets at a hardware store for extra support.
How To Install Adhesive/stick-on Blinds
If you want the simplest method, adhesive blinds are hard to beat:
1. Measure And Mark
Measure your window and use a pencil to lightly mark where the top of the blind will go.
2. Clean The Surface
Wipe down the window frame or glass with a mild cleaner. Let it dry completely.
3. Peel The Backing
Remove the protective strip from the adhesive tape on the blind’s top rail.
4. Position The Blind
Carefully line up the blind with your marks. Press the adhesive strip firmly against the surface.
5. Hold In Place
Press and hold the blind for 30–60 seconds to ensure the adhesive sticks well.
6. Let It Set
Wait at least one hour before using the blind. Some adhesives need up to 24 hours for full strength.
Non-obvious insight: Many people skip cleaning the mounting surface, but even a little dust or oil can make adhesive fail. Always clean thoroughly first.
Troubleshooting Common Problems
No-drill blinds are simple, but sometimes things don’t go as planned. Here are solutions to common issues:
Blinds Keep Falling Down
- Check if the window frame or wall is completely clean and dry
- Make sure you used the right size or strength of blind for your window
- For adhesive types, replace the tape with a stronger, outdoor-grade version if needed
Blinds Won’t Stay Level
- For tension rods, adjust both sides carefully and use a level if possible
- For magnetic blinds, make sure all magnets are placed evenly
Adhesive Leaves Residue
- Use a citrus-based cleaner or rubbing alcohol to remove sticky marks
- Avoid scraping with sharp tools, which can damage your paint or window frame
Blind Is Too Short Or Too Long
- Always check product specifications before buying
- If too short, consider using extension brackets (for tension-fit)
- If too long, trim adhesive blinds with scissors (only if the manufacturer says it’s safe)
Durability And Maintenance
No-drill blinds can last for years if you care for them properly. Here are some tips:
- Dust blinds regularly with a soft cloth or vacuum with a brush attachment
- For adhesive blinds, avoid pulling sharply—lift gently
- If a tension rod feels loose over time, check for wear or replace the rubber ends
- In high-humidity rooms, check adhesive or magnets every few months
Here’s a quick look at how long each type typically lasts:
| Type | Average Lifespan | Maintenance Tips |
|---|---|---|
| Tension-fit | 3-5 years | Check tension, clean ends |
| Magnetic | 5+ years | Clean magnets, check for rust |
| Adhesive | 1-3 years | Replace tape if needed |
Safety Considerations
Blinds can be a hazard for small children and pets. Always choose models with cordless operation if possible. For windows in high places, make sure blinds are secure and out of reach. If you need extra safety, look for blinds with child-safe certifications.
Credit: www.selectblindscanada.ca
Advanced Tips For A Professional Look
Many beginners miss these small details:
- Hide the mounting hardware: Some adhesive and tension blinds come with decorative covers for the ends or tops. Use them for a cleaner finish.
- Measure twice, buy once: Always double-check your window size before purchasing.
- Choose neutral colors: White, beige, or gray blinds blend well with most décor and make rooms feel brighter.
- Upgrade adhesive: If you want extra strength, use high-quality double-sided mounting tape from a hardware store.
Cost Comparison
How do no-drill blinds compare to traditional ones in price? Here’s an idea:
| Type | Price Range (per window) | Installation Cost |
|---|---|---|
| No-drill blinds | $20 – $60 | $0 (DIY) |
| Traditional blinds | $25 – $100 | $50 – $150 (with pro install) |
As you can see, no-drill blinds are cost-effective and save you on installation fees.
When Not To Use No-drill Blinds
There are times when drill-free blinds are not the best choice:
- Very large or heavy blinds: May not stay secure without drilling.
- Rough or uneven surfaces: Adhesive may not stick well.
- Windows exposed to high heat or humidity: Adhesive can weaken over time.
In these cases, a traditional installation may be safer and more durable.
Where To Buy No-drill Blinds
You can find a wide range of no-drill blinds online or in home improvement stores. Look for well-known brands and always read reviews. Some helpful sources include Home Depot and similar reputable retailers.
Frequently Asked Questions
What Is The Strongest Type Of No-drill Blind?
Magnetic blinds are usually the strongest—if you have a metal surface. For other windows, high-quality tension-fit models are very secure.
Can I Reuse No-drill Blinds After Removal?
Yes, most tension-fit and magnetic blinds can be reused. Adhesive blinds may lose stickiness after removal, but you can often replace the tape and use them again.
Will Adhesive Blinds Damage Paint Or Leave Marks?
Adhesive can sometimes leave residue, especially on older or delicate paint. Use a gentle cleaner to remove marks, and always test a small area first.
Are No-drill Blinds Suitable For Rental Apartments?
Absolutely! No-drill blinds are popular with renters because they do not damage walls or window frames. Just make sure to remove all hardware and clean up when moving out.
Can I Use No-drill Blinds On Sliding Glass Doors?
Yes, but choose blinds designed for large openings. Tension-fit or magnetic options can work, but always check the weight and size recommendations from the manufacturer.
Choosing to install blinds without drilling is a smart, modern solution for many homes. With the right type and careful installation, you can have privacy and style—no tools required. Your windows, and your landlord, will thank you.